

第一节:3D鼠标跟随
该实例实现的是一3D小球随“鼠标”跟随效果,在制作过程中主要使用了自定义函数进行影片控制,大量使用了循环语句和赋值语句。影片最终播放效果如图1.1所示:
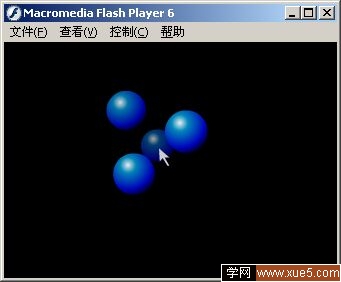
图1.1影片最终效果
1.新建一影片,通过属性面板设置其大小为600pxX450px(单位为象素)背景色为#000000。
2.新建一影片剪辑“Sphere”,选取“椭圆工具”,在工作区中绘制一椭圆,并去掉其轮廓。打开“混色器”面板进行如图1.2所示的设置:
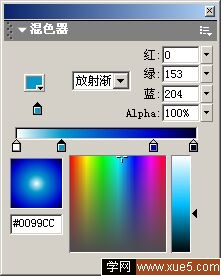
图1.2设置“混色器”面板
3.应用上面设置的填充色填充绘制的圆,并通过“填充渐变”工具设置其光线注入点效果使之给人一种很强的立体感,效果如图1.3所示:
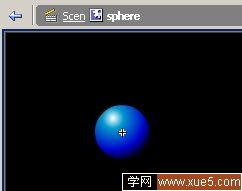
图1.3制作“sphere”
4.新建一影片剪辑“coursor”用线条工具在工作区中绘制如图1.4所示的鼠标图案,并设置其填充色为白色,并去除其轮廓线:
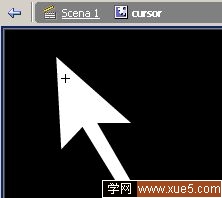
图1.4鼠标制作
5.新建一影片剪辑“animation”,将默认图层命名为“animation”,“ animation”只有一个图层,同时只有四帧。下面将分别为这四个关键帧进行相应设置
选中第1关键帧,添加如下ActionScript脚本代码:
// creazione della classe PuntoSpaziale
function PuntoSpaziale (x, y, z, target) {
// propriet?
this.target = target;
this.x = x;
this.y = y;
this.z = z;
this.firstx = x;
this.firsty = y;
this.firstz = z;
this.DFOWA = 100;
// Distance From Object World Axes
this.DFPP = 200;
// Distance From Proiection Plain
this.ScreenCenter_x = 300;
this.ScreenCenter_y = 200;
this.speed2dx = 0;
this.speed2dy = 0;
// metodi
this.Coord2DRelativeTo = Coord2DRelativeTo;
this.Coord3DRelativeTo = Coord3DRelativeTo;
this.Rotate = Rotate;
this.Scale = Scale;
this.UScale = UScale;
this.Traslate = Traslate;
this.Proiection_y = Proiection_y;
this.Proiection_x = Proiection_x;
this.DrawPoint = DrawPoint;
// funzioni che definiscono i metodi
function Coord3DRelativeTo (x1, y1, z1) {
// cambio di coordinate 3D in riferimento ad un'altro punto
this.x -= x1;
this.y -= y2;
this.z -= z3;
}
function Coord2DRelativeTo (x, y) {
// cambio di coordinate "D di proiezione in riferimento ad un'altro punto
// per esempio si pu?usare per centrare il punto (0,0) al centro dello schermo
// ( in tal caso passare come parametri le coordinate di tale centro )
this.ScreenCenter_x = x;
this.ScreenCenter_y = y;
}
function Rotate (teta_x, teta_y, teta_z) {
// rotazione intorno agli assi x, y e z espressa in radianti
if (teta_x != 0) {
ytemp = this.y;
this.y = this.y*Math.cos(teta_x)-this.z*Math.sin(teta_x);
this.z = ytemp*Math.sin(teta_x)+this.z*Math.cos(teta_x);
}
if (teta_
y != 0) {
xtemp = this.x;
this.x = this.x*Math.cos(teta_y)+this.z*Math.sin(teta_y);
this.z = this.z*Math.cos(teta_y)-xtemp*Math.sin(teta_y);
}
if (teta_z != 0) {
xtemp = this.x;
this.x = this.x*Math.cos(teta_z)-this.y*Math.sin(teta_z);
this.y = this.y*Math.cos(teta_z)+xtemp*Math.sin(teta_z);
}
}
function Scale (sx, sy, sz) {
// scalamento non uniforme
this.x *= sx;
this.y *= sy;
this.z *= sx;
}
function UScale (s) {
// scalamento uniforme
this.x *= s;
this.y *= s;
this.z *= s;
}
function Traslate (a, b, c) {
// traslazione
this.x += a;
this.y += b;
this.z += c;
}
function DrawPoint (i) {
// caratterrizza il nome e la profondit?dell'istanza duplicata
duplicateMovieClip (this.target, "punto"+i, i);
mymovieclip = eval("punto"+i);
setProperty ("punto"+i, _x, this.Proiection_x());
setProperty ("punto"+i, _y, this.Proiection_y());
setProperty ("punto"+i, _xscale, (100/(((this.z+this.DFOWA)/this.DFPP)+1)));
setProperty ("punto"+i, _yscale, (100/(((this.z+this.DFOWA)/this.DFPP)+1)));
myColor = new Color(eval("punto"+i));
myColorTransform = new Object();
s = (this.z+50)/1;
myColorTransform = {ra:'100', rb:-s, ga:'100', gb:-s, ba:'100', bb:-s, aa:'100', ab:'0'};
myColor.setTransform(myColorTransform);
}
function Proiection_x () {
// coordinata x della proiezione
this.proiectionx = (this.x/(((this.z+this.DFOWA)/this.DFPP)+1)+this.ScreenCenter_x);
return (this.x/(((this.z+this.DFOWA)/this.DFPP)+1)+this.ScreenCenter_x);
}
function Proiection_y () {
// coordinata y della proiezione
this.proiectiony = (this.y/(((this.z+this.DFOWA)/this.DFPP)+1)+this.ScreenCenter_y);
return (this.y/(((this.z+this.DFOWA)/this.DFPP)+1)+this.ScreenCenter_y);
}
}
// Funzione che prende un array di valori numerici e restituisce un
// array delle stesse dimensioni contenente nella prima posizione
// il numero ordinele che indica a che posto ?il primo elemento
// dell'array input quanto a grandezza
// per esempio se il primo elemento ?il pi?grande allora nell'array
// restituito avr?1 nella prima pos. Se ?il quarto pi?grande avr?
// 4 etc.....
// nel caso di due elementi coincidenti l'indice relativo sar?comunque diverso secondo un criterio casuale
function OrdIndex (InputArray) {
len = InputArray.length;
for (var e = 0; e InputArray[e] = InputArray[e]+Math.random()/100000000;
}
Index = new Array(len);
for (var i = 0; i var count = 0;
for (var j = 0; j
if (InputArray[i]<=InputArray[j]) {
count++;
}
}
Index[i] = count;
}
return Index;
}
选中第2关键帧,添加如下ActionScript脚本代码:
xrotation = 0;
yrotation = 0;
xposition = 0;
yposition = 0;
depth = 0;
var miopunto1 = new Puntospaziale(0, -25, 50, "point");
var miopunto2 = new Puntospaziale(-43.3, -25, -25, "point");
var miopunto3 = new Puntospaziale(43.3, -25, -25, "point");
var miopunto4 = new Puntospaziale(0, 43.3, 0, "point");
var miopunto5 = new Puntospaziale(0, 0, 0, "cursor");
Mouse.hide();
选中第3关键帧,从库面板中将“Sphere”和“coursor”插入工作区中,创建相应的实例,并分别为其实例命名为“point”和“sphere”,为第3关键帧添加如下ActionScript 脚本:
xrotation = 0.05-(yposition-_ymouse)/400-xrotation/5;
yrotation = (xposition-_xmouse)/400-xrotation/5+0.05;
zrotation = 0.05;
for (var i = 1; i<5; i++) {
eval("miopunto"+i).Rotate(xrotation, yrotation, zrotation);
eval("miopunto"+i).Speed2dx += (_xmouse-eval("miopunto"+i).ScreenCenter_x)/100-eval("miopunto"+i).Speed2dx/10;
eval("miopunto"+i).Speed2dy += (_ymouse-eval("miopunto"+i).ScreenCenter_y)/100-eval("miopunto"+i).Speed2dy/10;
xposition += eval("miopunto"+i).Speed2dx;
yposition += eval("miopunto"+i).Speed2dy;
eval("miopunto"+i).Coord2DRelativeTo(xposition, yposition);
}
miopunto5.x = _xmouse*1.5-450;
miopunto5.y = _ymouse*1.5-300;
depthArray = new Array(5);
for (var k = 1; k<=5; k++) {
depthArray[k-1] = eval("miopunto"+k).z;
}
IndexDepht = OrdIndex(depthArray);
for (var f = 1; f<=5; f++) {
eval("miopunto"+f).DrawPoint(IndexDepht[f-1]);
}
选中第4关键帧,添加如下ActionScript脚本代码:
gotoAndPlay(3);
6.返回主场景并将默认图层更名为“电影剪辑”,将“animation”插入工作区中,将建一图层“背景”,作矩形工具绘制一矩形,使其将整个工作区复盖,通过“混色器”面板将设置其填充色如图1.5所示:
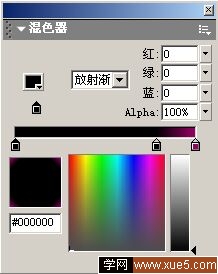
图1.5图设置填充色
通过填充渐变设置其填充效果如图1.6所示:

图1.6设置填充渐变效果
7.这样整个鼠控效果就制作完成,保存作品,按“ctrl Enter”预览最终效果。