TableLayout置底,TableRow在TableLayout的上面,而Button、TextView等控件就在TableRow之上,
另外,TableLayout之上也可以单独放控件。TableLayout是一个使用复杂的布局,最简单的用法就仅
仅是拖拉控件做出个界面,但实际上,会经常在代码里使用TableLayout,例如做出表格的效果。
android:collapseColumns:以第0行为序,隐藏指定的列
android:shrinkColumns:以第0行为序,自动延伸指定的列填充可用部分
android:stretchColumns:以第0行为序,尽量把指定的列填充空白部分
二、方案一代码展示:
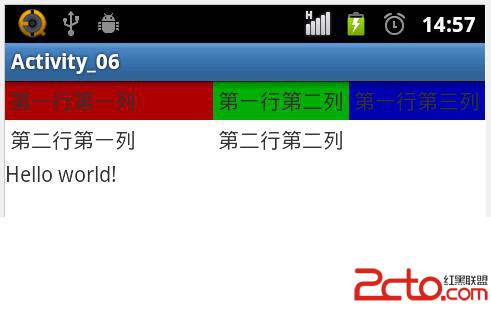
方案一采用xml布局,在代码中除了显示layout之外,未作任何布局相关的操作。
1."Acticity_06srcyanacticity_06MainActivity.java"
[java]
package yan.activity_06;
import android.os.Bundle;
import android.app.Activity;
public class MainActivity extends Activity {
@Override
public void onCreate(Bundle savedInstanceState) {
super.onCreate(savedInstanceState);
setContentView(yout.activity_main);
}
}
package yan.activity_06;
import android.os.Bundle;
import android.app.Activity;
public class MainActivity extends Activity {
@Override
public void onCreate(Bundle savedInstanceState) {
super.onCreate(savedInstanceState);
setContentView(yout.activity_main);
}
}
2."Activity_06reslayoutactivity_main.xml"
[html]
<TableLayout xmlns:android="/apk/res/android"
xmlns:tools="/tools"
android:layout_width="fill_parent"
android:layout_height="fill_parent"
tools:context=".MainActivity"
android:stretchColumns="0" >
<TableRow>
<TextView
android:text="第一行第一列"
android:background="#aa0000"
android:padding="3dip" />
<TextView
android:text="第一行第二列"
android:padding="3dip"
android:gravity="center_horizontal"
android:background="#00aa00"
></TextView>
<TextView
android:text="第一行第三列"
android:gravity="right"
android:background="#0000aa"
android:padding="3dip" />
</TableRow>
<TableRow>
<TextView
android:text="第二行第一列"
android:padding="3dip" />
<TextView
android:text="第二行第二列"
android:gravity="right"
android:padding="3dip" />
</TableRow>
<TextView
android:layout_width="wrap_content"
android:layout_height="wrap_content"
android:text="@string/hello_world" />
</TableLayout>
三、方案二代码展示:
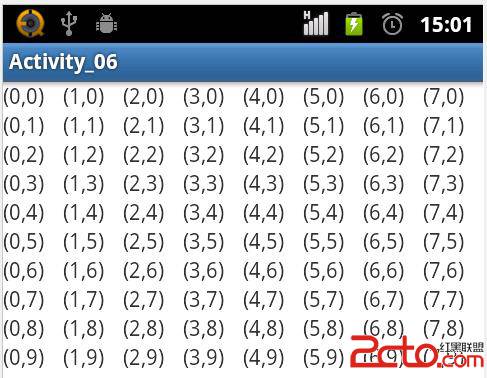
方案二采用代码布局,在layout文件中除了显示一个空的TabLayout之外,未作任何其它布局。
1."Acticity_06srcyanacticity_06MainActivity.java"
[java]
package yan.activity_06;
import android.os.Bundle;
import android.view.ViewGroup;
import android.widget.TableLayout;
import android.widget.TableRow;
import android.widget.TextView;
import android.app.Activity;
public class MainActivity extends Activity {
/** Called when the activity is first created. */
private final int WC = youtParams.WRAP_CONTENT;
private final int FP = youtParams.FILL_PARENT;
@Override
public void onCreate(Bundle savedInstanceState) {
super.onCreate(savedInstanceState);
setContentView(yout.activity_main);
//新建TableLayout01的实例
TableLayout tableLayout = (TableLayout)findViewById(R.id.TableLayout01);
//全部列自动填充空白处
tableLayout.setStretchAllColumns(true);
//生成10行,8列的表格
for(int row=0;row<10;row++)
{
TableRow tableRow=new TableRow(this);
for(int col=0;col<8;col++)
{
//tv用于显示
TextView tv=new TextView(this);
tv.setText("("+col+","+row+")");
tableRow.addView(tv);
}
//新建的TableRow添加到TableLayout
tableLayout.addView(tableRow, new youtParams(FP, WC));
}
}
}
2."Activity_06reslayoutactivity_main.xml"
[html]
<?xml version="1.0" encoding="utf-8"?>
<LinearLayout xmlns:android="/apk/res/android"
android:orientation="vertical"
android:layout_width="fill_parent"
android:layout_height="fill_parent"
>
<TableLayout
android:id="@+id/TableLayout01"
android:layout_width="fill_parent"
android:layout_height="wrap_content">
</TableLayout>
</LinearLayout>
三、效果展示:
1.方案一:

2.方案二:


