

利用Coreldraw的交互式工具可以制作出一系列特殊效果,通过变形对象,给对象添加新的元素或改变对象外观等多种操作,使其达到不同的效果,本文以制作蝴蝶为例,介绍造型工具和交互式工具的使用。

花蝴蝶预览效果图
一、贝塞尔造型工具绘制蝴蝶翅膀
执行【文件】|【新建】命令,建立一个新的文件(或按键盘上的Ctrl+N快捷键)。
步骤1 绘制蝴蝶翅膀
在工具箱中选择【贝塞尔工具】

,鼠标在工作区变为

形状,在图层中拖动鼠标,绘制不规则图形如图1-4-1所示。

步骤2镜像对象
选择渐变填充后的对象,执行【编辑】|【仿制】命令,复制对象。
用鼠标移动复制后的对象到合适的位置,单击属性栏中的【水平镜像】按钮

,执行镜像操作,效果如图1-4-5所示。

图1-4-5镜像对象
步骤3 绘制蝴蝶其他翅膀
依次在工具箱中选择【贝塞尔工具】

,在图层中拖动鼠标,绘制不规则图形。并在工具箱中单击【形状工具】

,用鼠标单击图形对象进行节点编辑,作为蝴蝶下端的翅膀,设置效果如图1-4-6所示。
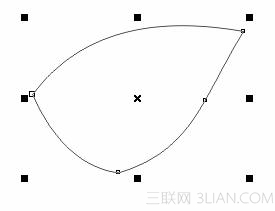
图1-4-6设置节点变形

图1-4-7复制属性设置
按照上面参数设置,单击【确定】按钮,此时鼠标形状变为黑色箭头,用鼠标单击前面绘制的翅膀,执行效果如图1-4-8所示。
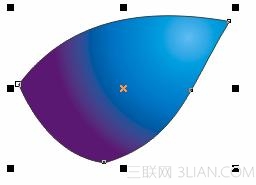
图1-4-8复制填充属性
将翅膀移动到前面绘制的翅膀下面,复制对象调整位置,执行效果如图1-4-9所示。

图1-4-9复制翅膀
步骤4 绘制蝴蝶身体
在工具箱中选择【椭圆工具】

,在图层中绘制椭圆对象,并将椭圆填充的CMYK值设置为(0,20,20,50),设置效果如图1-4-10所示。

图1-4-10绘制椭圆
依次在工具箱中选择【矩形工具】
,在椭圆对象上绘制矩形作为身体的花纹,效果如图1-4-11所示。
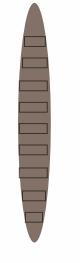
图1-4-11绘制矩形选择所有的矩形对象,依次在工具箱中选择【单色填充工具】

,打开【单色填充】对话框,设置填充参数如图1-4-12所示。
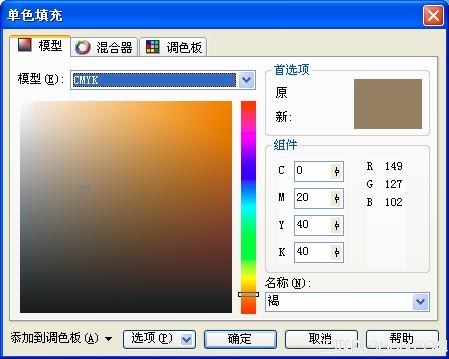
图1-4-12设置单色填充
按照上面参数设置,单击【确定】按钮,执行效果如图1-4-13所示。
图1-4-13设置矩形填充
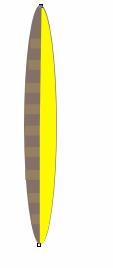

图1-4-14绘制半圆
选择黄色的半圆对象,依次在工具箱中选择【交互式透明工具】

,用鼠标向下拖动,调整透明控制手柄使其越向下透明程度越强,执行效果如图1-4-15所示。
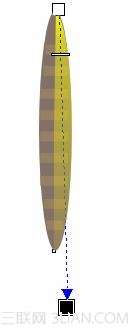
图1-4-15设置透明操作
步骤5 绘制蝴蝶眼睛与触角
接下来用【椭圆工具】

在蝴蝶身的上部绘制椭圆对象作为眼睛,并设置椭圆形填充的CMYK值设置为(60, 0,20, 0),设置效果如图1-4-16所示。
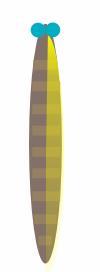

图1-4-16绘制椭圆
在工具箱中单击【三点曲线工具】

,在眼睛上面绘制曲线对象作为蝴蝶触角。
选择触角对象,依次执行【排列】|【顺序】|【到后面】命令,将触角对象放置在图层的最后面,设置效果如图1-4-17所示。
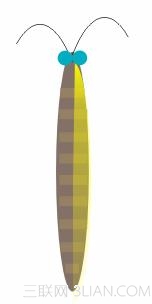
图1-4-17调整位置
选择蝴蝶身与眼睛、触角对象,执行【排序】|【群组】命令,将对象组合在一起。
二、交互式阴影工具表现翅膀的美丽色彩
选择组合在一起的对象,将其移动到前面绘制的蝴蝶翅膀上面,调整位置,效果如图1-4-18所示。

图1-4-18组合对象
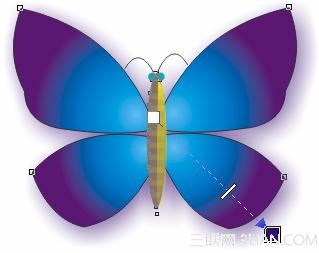
图1-4-19设置阴影效果