

记得亚马逊没改版之前,首页的幻灯片我很喜欢,每个数字上面都带有进度条。
闲的无聊,自己实现了一个。用的jquery。
主要用到animate()方法,
因为有一个进度条的播放过程。
不支持ie6,当然,改改还是可以的。
演示
下载
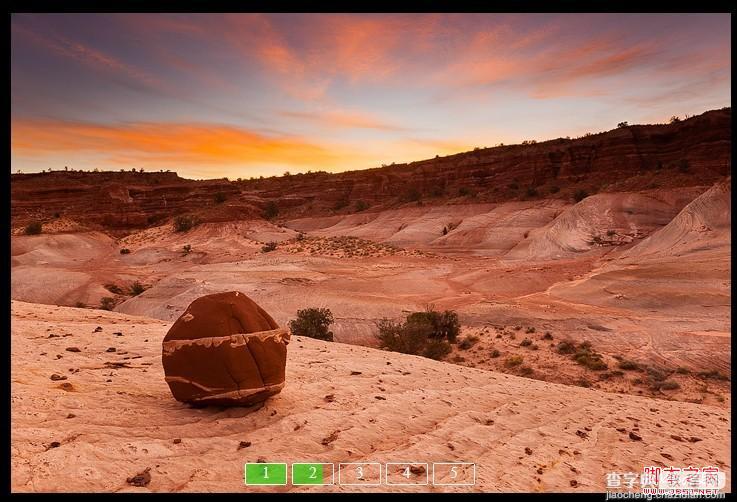
先看下效果图
看代码吧:
复制代码 代码如下:
<!DOCTYPE html>
<html>
<head>
<title>slide play with loadbar--by loethen</title>
<meta charset='utf-8'>
<style>
*{padding: 0;margin:0;}
ul li{list-style: none;}
.slideplay ,.slideshow{
position: relative;
}
.slideshow li{
position: absolute;
left: 0;
top: 0;
display: none;
}
.loadbar{
position: absolute;
bottom: 60px;
left: 250px;
z-index: 9;
}
.loadbar li{
width: 40px;
height: 20px;
float: left;
position: relative;
margin-right: 5px;
border-radius: 2px;
border: 1px solid #e5f9ff;
}
.loadbar span{
position: absolute;
left: 0;
top: 0;
height: 20px;
width: 40px;
text-align: center;
z-index: 12;
cursor: pointer;
color: #fff;
border-radius: 2px;
}
.loadbar em{
position: absolute;
left: 0;
top: 0;
height: 20px;
background: #31d81a;
z-index: 10;
border-radius: 2px;
opacity: 0.7
}
.zindex{
z-index: 1;
}
</style>
<script src='js/jquery.min.js'></script>
</head>
<body>
<div id="slideplay">
<ul>
<li><img src="images/a.jpg" ></li>
<li><img src="images/b.jpg" ></li>
<li><img src="images/c.jpg" ></li>
<li><img src="images/d.jpg" ></li>
<li><img src="images/e.jpg" ></li>
</ul>
<ul>
<li>
<span>1</span>
<em></em>
</li>
<li>
<span>2</span>
<em></em>
</li>
<li>
<span>3</span>
<em></em>
</li>
<li>
<span>4</span>
<em></em>
</li>
<li>
<span>5</span>
<em></em>
</li>
</ul>
</div>
<script type='text/javascript'>
$(function(){
var slide = $('.slideplay'),
ulShow = $('.slideshow'),
sLi = ulShow.find('li'),
bLi = $('.loadbar li'),
len = sLi.length;
var option ={
speed:3000,
barWidth:40
},
barSpeed = option.speed-100;
var w = sLi.first().width(),
h = sLi.first().height();
var flag = 0,
timer = null;
ulShow.css({
width:w+'px',
height:h+'px'
});
slide.css({
width:w+'px',
height:h+'px'
});
init();
function init(){
sLi.eq(flag).addClass('zindex').show();
bLi.eq(flag).find('em').animate({width:option.barWidth},barSpeed);
timer = setTimeout(function(){
next();
},option.speed);
ulShow.on('mouseover',doStop);
ulShow.on('mouseleave',doAuto);
bLi.on('mouseover',handPattern);
}
function handPattern(){
doStop();
flag = $(this).index();
imgMove();
bLi.find('em').css('width',0);
bLi.eq(flag).find('em').width(option.barWidth);
}
function doStop(){
timer && clearTimeout(timer);
bLi.eq(flag).find('em').stop();
}
function doAuto(){
var em = bLi.eq(flag).find('em'),
w = em.width(),
leftW = option.barWidth - w ,
sec = (leftW * barSpeed)/option.barWidth;
em.animate({width:option.barWidth},sec,function(){
if(flag==len-1){
em.width(0);
next();
}else{
next();
}
});
}
function next(){
flag++;
flag==len && (flag=0);
doMove();
}
function doMove(){
imgMove();
loadbarMove();
}
function imgMove(){
sLi.eq(flag).addClass('zindex').fadeIn('slow')
.siblings().removeClass('zindex').fadeOut('slow');
}
function loadbarMove(){
bLi.eq(flag).find('em').
animate({width:option.barWidth},barSpeed,function(){
if(flag==len-1){
bLi.find('em').width(0);
next();
}else{
next();
}
});
}
})
</script>
</body>
</html>