

本文总结它的使用方法和一些使用心得,内容不算很高深,纯粹是入门内容,看看即可。不过要是你还没有用过此类的javascript引擎库,那么本文还是值得你一读的,相信在你了解完它强大的功能和简单用法之后,一定会迫不及待地将之用于你的工作当中。
1. 从一个简单真实的需求讲起
目前公司做了一个统一的开发平台,后台封装了MVC的接口和数据增删改查的接口,前端我自己用bootstrap+手写各类组件的方式弄了一套开发框架;集成了CAS,在CAS的基础上,首先做了一套统一权限管理系统,这个系统是我们开发平台的第一个子系统,用来管理配置所有子系统的菜单和授权以及管理整个公司的组织结构和用户,后来我们又陆陆续续地开发了业务系统A和业务系统B。由于这三个子系统对应的是三个java工程,最终部署的时候,在tomcat里部署了三个应用,现在有一个需求是:
1)在每个系统里登录之后,点击系统名称,可以展开一个下拉菜单,显示所有有权限的子系统; 2)然后用户点击其它子系统,就可以切换到所选中的系统去,到了其它系统之后,由于都做了这个下拉菜单,所以也可以再从该系统切换回来; 3)如果用户只有一个系统的权限,则不显示下拉菜单。
需求其实挺简单,原型大概是这个样子:
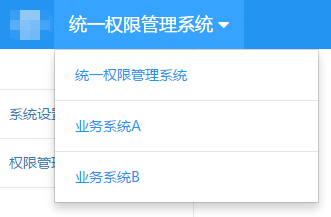
功能实现方法是,在每个子系统登录完成之后,调用获取系统列表的接口,用js渲染一个下拉菜单出来,该接口返回的格式为:
data: [ { "sortOrder": 1, "isCurrent": true, "systemHttpUrl": "http://xxxx:8080/permission", "systemName": "统一权限管理系统" }, { "sortOrder": 2, "isCurrent": false, "systemHttpUrl": "http://xxxx:8080/systemA", "systemName": "业务系统A" }, { "sortOrder": 3, "isCurrent": false, "systemHttpUrl": "http://xxxx:8080/systemB", "systemName": "业务系统B" } ]
如果我们不采用模板引擎,那么传统的方式去解析这个数据并把它转变成html串的方法通常是:
function data2Html(data) { data = data || []; var html = ['<ul>', ' <li>', ' <a href="javascript:;" data-toggle="dropdown" title="切换系统">'], l = data.length; if(l < 2) { l == 1 && html.push(data[0].systemName || ''); html.push('</a></li></ul>'); return html.join(''); } var curSysAry = data.filter(function(s){ return s.isCurrent; }); html.push(curSysAry[0].systemName + ' <i></i></a><ul>'); data.sort(function(a, b){ return a.sortOrder - b.sortOrder;}); for(var i = 0; i < l; i++) { i && html.push('<li role="separator"></li>'); html.push('<li><a href="' + data[i].systemHttpUrl + '" target="_self">' + data[i].systemName + '</a></li>'); } html.push('</ul></li></ul>'); return html.join(''); }
这种拼接字符串的方式有诸多弊端:
1)麻烦,尤其是拼接逻辑复杂,拼接的串很长时; 2)不易维护,稍有不慎就会弄错标签的对应关系; 3)结构不清晰。
能够简化这个场景的工具就是模板引擎,模板引擎的技术后台最先有,如果你用过jsp,就一定知道jsp也就是一个模板,用来解析呈现数据用的,其它后台模板引擎还有velocity和freemarker等等。前端的模板引擎也有很多,mustache.js算是比较流行的一个,git上有8000多个赞,如果这个问题我们用mustache.js来做,就可以变成这样:
//通过一些根据属性名称对应的标记定义模板 var _template = [ '<ul>', ' <li>', ' <a href="javascript:;" data-toggle="dropdown" title="切换系统">', ' {{curSystemName}} {{#multiple}}<i></i>{{/multiple}}', ' </a>', ' {{#multiple}}<ul>', ' {{#systems}}', ' {{^first}}<li role="separator"></li>{{/first}}', ' <li>', ' <a href="{{{systemHttpUrl}}}" target="_self">{{systemName}}</a>', ' </li>', ' {{/systems}}', ' </ul>{{/multiple}}', ' </li>', '</ul>' ].join(''); //初始化这个模板 Mustache.parse(_template); function data2Html(data) { data = data || []; var curSysAry = data.filter(function(s){ return s.isCurrent; }); data.sort(function(a, b){ return a.sortOrder - b.sortOrder;}); data = data.map(function(s, i){s.first = i == 0; return s}); //模板渲染成字符串 return Mustache.render(_template, { curSystemName: curSysAry.length ? curSysAry[0].systemName : '', multiple: !!data.length, systems: data }); }
对比两个代码,会发现后面的代码,相对于前面的有以下这些优点:
1)结构清晰,所有待渲染的html都定义在一个位置,而且没有任何拼接的现象; 2)逻辑清晰,那些在模板里的标记,实际上与模板渲染时传进去的对象的属性名称都是对应的; 3)易维护,要增删标签都只用调整模板对应的数组就行了。
通过这个例子,应该能对模板引擎有了一个大概的认识,这类工具在前端开发中越来越普遍,尤其是前后端分离的应用中用的更多,已经是这类应用的基础架构的内容了。mustache.js是一个非常简单易用的引擎实现,接下来的内容将会对这个工具常用的模板配置一一介绍并配合实用的例子说明,希望能让你更喜欢这个工具:)
2. mustache的用法
mustache的使用非常简单,先通过script标签引入它的js文件,然后按下面的步骤操作:
1)定义模板字符串
定义模板有2种方式,方式一就是在前面部分中看到的,直接用[...].join('')的方式在js代码中定义,方式二直接把模板内容用script定义在html中:
<script id="tpl" type="text/html"> Hello {{name}}! </script>
然后在编译模板之前,通过获取tpl的innerHTML定义原始模板串:
var tpl = document.getElementById('tpl').innerHTML.trim();
具体要用哪种方式来定义模板,可以参考下面的建议:
如果这个模板要用于多个页面,推荐把模板定义在js代码中;如果这个模板只用于当前页面,推荐直接定义到script标签中,管理更方便。
2)预编译模板
假设原始模板串已经定义好,并用tpl变量来引用,就可以通过下面的代码来预编译模板:
Mustache.parse(tpl);
要注意的是,经过预编译之后的tpl已经不再是原来的模板串了,连数据类型都变成数组类型了,这都是预编译的结果。
3)渲染模板
渲染方式很简单:
var htmlAfterRendered = Mustache.render(tpl1, obj);
obj引用的是一个数据源对象,mustache会把模板中那些属性标签,根据约定的规则,替换成对象的内容。htmlAfterRendered就是替换之后的字符串,你可以用它完成你需要的DOM操作。
3. mustache的思想
mustache的核心是标签和logic-less。从前面的代码中可以看到定义模板时,使用了{{name}}这样的标记,还有{{#systems}}{{/systems}},这就是mustache的标签,只不过它用{{}}替代了<>,以免跟html标签的<>混淆。logic-less,可以翻译为轻逻辑,因为在定义模板的时候不会用到if-else,不会有循环式的编码,一切都用标签来解决,它的标签非常简单,但是能应付所有场景,阅读完本文之后,你会惊讶地发现,只要用以下几个标签几乎就能解决所有的问题:
{{prop}}
{{{prop}}}
{{#prop}}{{/prop}}
{{^prop}}{{/prop}}
4. {{prop}}标签
这个标签是mustache模板里用的最多的,可以将数据源对象上prop属性对应的值,转换成字符串进行输出,以下是同一个属性,对应不同类型的值,在经过mustache渲染之后输出结果的测试(前后那根短横线的作用是为了让这个标签的渲染结果看起来更清楚):
<script id="tpl1" type="text/html"> -{{prop}}- </script> <script> var tpl1 = document.getElementById('tpl1').innerHTML.trim(); Mustache.parse(tpl1); //测试falsy值 console.log(Mustache.render(tpl1, {prop: ''}));//-- console.log(Mustache.render(tpl1, {prop: 0}));//-0- console.log(Mustache.render(tpl1, {prop: null}));//-- console.log(Mustache.render(tpl1, {prop: undefined}));//-- console.log(Mustache.render(tpl1, {prop: false}));//-false- console.log(Mustache.render(tpl1, {prop: NaN}));//-NaN- //测试简单对象 console.log(Mustache.render(tpl1, {prop: {name: 'jason'}}));//-[object Object]- //测试数组 console.log(Mustache.render(tpl1, {prop: [{name: 'jason'}, {name: 'frank'}]}));//-[object Object],[object Object]- //测试日期对象 console.log(Mustache.render(tpl1, {prop: new Date()}));//-Mon Jan 18 2016 15:38:46 GMT+0800 (中国标准时间)- //测试自定义toString的简单对象 var obj1 = {name: 'jason'}; obj1.toString = function () { return this.name; }; console.log(Mustache.render(tpl1, {prop: obj1}));//-jason- //测试boolean number string console.log(Mustache.render(tpl1, {prop: true}));//-true- console.log(Mustache.render(tpl1, {prop: 1.2}));//-1.2- console.log(Mustache.render(tpl1, {prop: 'yes'}));//-yes- //测试function console.log(Mustache.render(tpl1, { prop: function () { } }));//-- console.log(Mustache.render(tpl1, { prop: function () { return 'it's a fun' } }));//-it's a fun- console.log(Mustache.render(tpl1, { prop: function () { return false; } }));//-false- console.log(Mustache.render(tpl1, { prop: function(){ return function (text, render) { return "<b>" + render(text) + "</b>" }; } })); //-function (text, render) { // return "<b>" + render(text) + "</b>" //}- </script>
mustache渲染{{prop}}标签的逻辑是:
1)如果prop引用的值是null或undefined,则渲染成空串; 2)如果prop引用的是一个函数,则在渲染时自动执行这个函数,并把这个函数的返回值作为渲染结果,假如这个返回值为null或者undefined,那么渲染结果仍然为空串,否则把返回值转成字符串作为渲染结果(注意最后一个用例,直接把函数代码渲染出来了); 3)其它场景,直接把prop引用的值转成字符串作为渲染结果。
由于默认情况下,mustache在渲染prop时,都是对prop的原始值进行url编码或者html编码之后再输出的,所以有一个用例的渲染结果,把英文的单引号,转成了html实体符:
console.log(Mustache.render(tpl1, { prop: function () { return 'it's a fun' } }));//-it's a fun-
如果要阻止这种编码行为,只要把标签形式改成{{{prop}}}就可以了:
<script id="tpl1" type="text/html"> -{{{prop}}}- </script> console.log(Mustache.render(tpl1, { prop: function () { return 'it's a fun' } }));//-it's a fun-
5. {{#prop}}{{/prop}}标签
这对标签的作用非常强大,可以同时完成if-else和for-each以及动态渲染的模板功能。在这对标签之间,可以定义其它模板内容,嵌套所有标签。接下来看看mustache如何利用这个对标签完成这三个模板功能。
1) if-else渲染
只有prop属性在数据源对象上存在,并且不为falsy值(javascript 6个falsy值:null,undefined,NaN,0,false,空字符串),并且不为空数组的情况下,标签之间的内容才会被渲染,否则都不会被渲染:
<script id="tpl2" type="text/html"> -{{#prop}}content{{/prop}}- </script> <script> var tpl2 = document.getElementById('tpl2').innerHTML.trim(); Mustache.parse(tpl2); //测试falsy值 console.log(Mustache.render(tpl2, {prop: ''}));//-- console.log(Mustache.render(tpl2, {prop: 0}));//-- console.log(Mustache.render(tpl2, {prop: null}));//-- console.log(Mustache.render(tpl2, {prop: undefined}));//-- console.log(Mustache.render(tpl2, {prop: false}));//-- console.log(Mustache.render(tpl2, {prop: NaN}));//-- //测试空数组 console.log(Mustache.render(tpl2, {prop: []}));//-- //测试不存在的属性 console.log(Mustache.render(tpl2, {prop2: true }));//-- //测试function console.log(Mustache.render(tpl2, { prop: function () { } }));//-- console.log(Mustache.render(tpl2, { prop: function () { return false; } }));//-- console.log(Mustache.render(tpl2, { prop: function() { return []; } }));//-- //测试简单对象 console.log(Mustache.render(tpl2, {prop: {name: 'jason'}}));//-content- //测试日期对象 console.log(Mustache.render(tpl2, {prop: new Date()}));//-content- //测试boolean number string console.log(Mustache.render(tpl2, {prop: true}));//-content- console.log(Mustache.render(tpl2, {prop: 1.2}));//-content- console.log(Mustache.render(tpl2, {prop: 'yes'}));//-content- //测试返回非falsy,非空数组的function console.log(Mustache.render(tpl2, { prop: function () { return 'it's a fun' } }));//-content- </script>
以上用例中特殊点的就是prop属性引用的是一个函数的时候,{{#prop}}会自动调用这个函数,并把函数的返回值作为if-else渲染逻辑的判断依据,也就是说如果这个函数返回的是falsy值或者是空数组的时候,那么这对标签之间的内容还是不会显示。
2)for-each渲染
当prop属性所引用的是一个非空数组时,这对标签之间的内容将会根据数组大小进行迭代,并且当数组元素为对象时,还会把该对象作为每一次迭代的上下文,以便迭代时的标签可以直接引用数组元素上的属性:
<script id="tpl2" type="text/html"> -{{#prop}}{{name}},{{/prop}}- </script> <script> var tpl2 = document.getElementById('tpl2').innerHTML.trim(); Mustache.parse(tpl2); console.log(Mustache.render(tpl2, {prop: [{name: 'jason'}, {name: 'frank'}]}));//-jason,frank,- </script>
从这个测试结果中可以看到,{{#prop}}{{/prop}}之间的模板内容根据prop所引用的数组迭代了两次,并且在这对标签内部直接通过{{name}}标签,输出了数组元素对象上的name属性对应的值。
如果prop属性所引用的是一个函数,但是这个函数返回值是一个数组类型,那么仍然会进行for-each渲染:
<script id="tpl2" type="text/html"> -{{#prop}}{{name}},{{/prop}}- </script> <script> var tpl2 = document.getElementById('tpl2').innerHTML.trim(); Mustache.parse(tpl2); console.log(Mustache.render(tpl2, { prop: function(){ return [{name: 'jason'}, {name: 'frank'}]; } }));//-jason,frank,- </script>
3) 动态渲染
当prop属性所引用的是一个函数,并且这个函数的返回值还是一个函数的话,mustache会再次调用这个返回的函数,并给它传递2个参数:text表示原来的模板内容,render表示mustache内部的执行渲染的对象,以便在这个函数内部可以通过这render对象,结合原来的模板内容,自定义渲染的逻辑,并把函数的返回值作为渲染结果(这个返回值渲染的逻辑跟{{prop}}标签完全一样):
<script id="tpl2" type="text/html"> -{{#prop}}content{{/prop}}- </script> <script> var tpl2 = document.getElementById('tpl2').innerHTML.trim(); Mustache.parse(tpl2); console.log(Mustache.render(tpl2, { prop: function(){ return function (text, render) { return "<b>" + render(text) + "</b>" }; } }));//-<b>content</b>- </script>
6. {{^prop}}{{/prop}}标签
这对标签,与{{#prop}}{{/prop}}的if-else渲染执行相反逻辑,即只有在prop属性不存在,或者引用的是一个falsy值,或者是一个空数组的时候才会显示标签之间的内容,否则不会显示:
<script id="tpl2" type="text/html"> -{{^prop}}content{{/prop}}- </script> <script> var tpl2 = document.getElementById('tpl2').innerHTML.trim(); Mustache.parse(tpl2); //测试falsy值 console.log(Mustache.render(tpl2, {prop: ''}));//-content- console.log(Mustache.render(tpl2, {prop: 0}));//-content- console.log(Mustache.render(tpl2, {prop: null}));//-content- console.log(Mustache.render(tpl2, {prop: undefined}));//-content- console.log(Mustache.render(tpl2, {prop: false}));//-content- console.log(Mustache.render(tpl2, {prop: NaN}));//-content- // 测试空数组 console.log(Mustache.render(tpl2, {prop: []}));//-content- // 测试不存在的属性 console.log(Mustache.render(tpl2, {prop2: true}));//-content- //测试function console.log(Mustache.render(tpl2, { prop: function () { } }));//-content- console.log(Mustache.render(tpl2, { prop: function () { return false; } }));//-content- console.log(Mustache.render(tpl2, { prop: function () { return []; } }));//-content- //测试简单对象 console.log(Mustache.render(tpl2, {prop: {name: 'jason'}}));//-- //测试日期对象 console.log(Mustache.render(tpl2, {prop: new Date()}));//-- // 测试非空数组 console.log(Mustache.render(tpl2, {prop: [{name: 'jason'},{name: 'tom'}]}));//-- //测试boolean number string console.log(Mustache.render(tpl2, {prop: true}));//-- console.log(Mustache.render(tpl2, {prop: 1.2}));//-- console.log(Mustache.render(tpl2, {prop: 'yes'}));//-- //测试返回非falsy,非空数组的function console.log(Mustache.render(tpl2, { prop: function () { return 'it's a fun' } }));//-- //测试返回function的function console.log(Mustache.render(tpl2, { prop: function () { return function(text,render){ return '<b>' + render(text) +'</b>' } } }));//-- </script>
7. 渲染上下文
mustache有一个渲染上下文栈的概念,在模板渲染的开始的时候,把数据源对象作为当前的渲染上下文 ,并压入上下文栈。在遇到{{#prop}}标签的时候,如果prop引用的是一个对象或者是一个非空的对象数组,或者prop引用的是一个函数,并且这个函数返回的是一个对象或者是一个非空的对象数组,就会把这个对象或者数组的元素作为当前渲染上下文,并压入上下文栈,当这个标签渲染完毕的时候,才会把该上下文弹出,恢复上一层标签所使用的上下文。由于{{#prop}}标签可以多层嵌套,所以在有的模板渲染的时候,会有多层上下文存在。mustache在解析标签时,根据标签名称查找当前上下文对象是否存在该属性,如果不存在就会到上层上下文对象中查找,只要在某一层找到,就会用该层上下文对象的值来渲染。
<script id="tpl2" type="text/html"> -{{#person}}{{#student}}{{#address}}address: {{home}},age: {{age}}{{/address}}{{/student}}{{/person}}- </script> <script> var tpl2 = document.getElementById('tpl2').innerHTML.trim(); var obj2 = { age: 20, person: { student: { address: { home: 'xxxxx' } } } }; console.log(Mustache.render(tpl2, obj2));//-address: xxxxx,age: 20- </script>
上面这个例子中,在渲染{{#address}}{{/address}}时,上下文对象已经变成了obj2.person.student.address所引用的对象,所以{{home}}渲染时用到的就是obj2.person.student.address.home属性,而{{age}}渲染时,由于obj2.person.student.address不存在age属性,所以就会到上层上下文中查找,一直到obj2对象才找到,于是就把obj2.age当成了渲染结果。
还有一种方法,不用通过{{#prop}}创建新的上下文,也可以做到递归渲染属性的属性:
<script id="tpl2" type="text/html"> -address: {{person.student.address.home}},age: {{age}}- </script> <script> var tpl2 = document.getElementById('tpl2').innerHTML.trim(); var obj2 = { age: 20, person: { student: { address: { home: 'xxxxx' } } } }; console.log(Mustache.render(tpl2, obj2));//-address: xxxxx,age: 20- </script>
这种方法其实很好理解,只要知道当前的上下文对象,再根据属性操作串person.student.address.home,当然就能找到需要的值了。
本文介绍了一个非常好用的前端模板引擎,涵盖的内容包含了在日常工作肯定会用到的知识点,希望大家喜欢。