上传进度条通常是由前面jquery加后端了脚本器脚本来实现了,今天我们介绍的是一款基本php+jQuery实现文件上传进度条效果的例子,具体细节如下。
最近呢,一个项目做一个进度条的效果出来,这个之前还真没做过。刚好这周没什么东西了,就拿这个来充一下数吧。
文件上传,得先准备一个“按钮”:

这个看上去还是不错的吧,实现也是很简单的:
<span>开始上传文件</span> <button>太丑了,就用span来做了,可控性强。添加点css: .upload-span{ display: inline-block; width: 120px; height: 40px; color: #FFFFFF; text-align: center; line-height: 40px; background-color: blue; border: 2px solid blue; border-radius:5px; cursor: pointer; letter-spacing: 2px; }
当点击就会触发上传效果,之后添加事件。
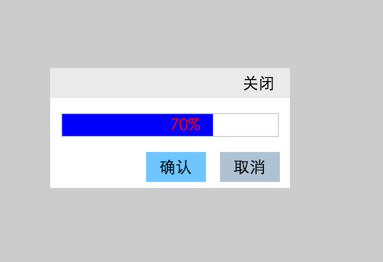
逼真一点,得再加一个遮罩和一个显示进度条的控件,点击span后,效果大概是这样子的:

<div></div> <div> <div> <span>关闭</span> </div> <div> <div> <span></span> <span></span> </div> <div> <span>确认</span> <span>取消</span> </div> </div> </div>
加点css上去:
.upload-mask{ position: absolute; top: 0; left: 0; z-index: 9; width: 100%; height: 100%; background-color: rgba(84,84,84,0.3); display: none; } .upload-component{ position: absolute; z-index: 99; top: 50%; left: 50%; margin-left: -120px; margin-top: -60px; width: 240px; height: 120px; background-color: #FFFFFF; display:none; } .upload-close{ position: relative; height: 30px; background-color: rgb(234,234,234); } .upload-close span{ position: absolute; right: 15px; line-height: 30px; cursor: pointer; } .upload-content,.confirm-cancel{ margin-top: 15px; } .progress{ position:relative; width:90%; height:22px; margin-left: 4.88888%; text-align: center; line-height: 22px; /*background-color: blue;*/ border:1px solid #ccc; } .upload-text{ position:absolute; z-index: 99999; color:red; } .uploaded{ position:absolute; left:0; z-index: 9999; width:0%; height:100%; background-color: blue; color:#FFFFFF; } .confirm-cancel span{ display:inline-block; width:60px; height:30px; line-height: 30px; text-align: center; /*cursor:pointer;*/ background-color:#ccc; cursor:wait; } .confirm{ /*background-color: rgb(111,197,293);*/ margin-left:40%; } .cancel{ /*background-color: rgb(175,194,211);*/ margin-left: 10px; }
为了模拟进度的显示,在这里用了两个span:
<div> <span></span> <span></span> </div>
上面一个是用来显示百分比的,下面一个用来填色的:
.upload-text{ position:absolute; z-index: 99999; color:red; } .uploaded{ position:absolute; left:0; z-index: 9999; width:0%; height:100%; background-color: blue; color:#FFFFFF; }
为了逼真,给填色的span设置背景色,其宽度就是进度的百分比,最后就用js来模拟进度的变化了:
// 模拟进度 function progressBar() { var max = 100; var init = 0; var uploaded; var test = setInterval(function() { init += 10; uploaded = parseInt((init / max * 100)) + '%'; $uploadTextSpan.text(uploaded).next().css({ width:uploaded }); if (init === 100) { clearInterval(test); $uploadTextSpan.text('上传完成'); $('.confirm-cancel span').css({ cursor:'pointer' }); $('.confirm').css({ backgroundColor:'rgb(111,197,293)' }); $('.cancel').css({ backgroundColor:'rgb(175,194,211)' }) $closeConfirmCancel.on('click',closeConfirmCancel); } else { $closeConfirmCancel.off('click',closeConfirmCancel); $('.upload-close-span').on('click',function(){ clearInterval(test); closeConfirmCancel(); }); $uploadMask.on('click',function() { clearInterval(test); closeConfirmCancel(); }) } },1000); }
JQuery实现文件上传进度条,能显示上传的百分比等信息,内容就到这里了,希望大家能够喜欢。


