对jQuery相信很多同学和我一样平时都是拿来主义,没办法,要怪只能怪jQuery太火了,各种插件基本能满足平时的要求。但是这毕竟不是长久之道,古人云:“授之以鱼,不如授之以渔”。
为了方便之前没有接触的同学,先来回顾一下jQuery的插件机制吧。
复制代码 代码如下:
//添加check和uncheck插件
jQuery.fn.extend({
check: function() {
return this.each(function() { this.checked = true; });
},
uncheck: function() {
return this.each(function() { this.checked = false; });
}
});
//插件的使用
$("input[type=checkbox]").check();
$("input[type=radio]").uncheck();
其实jQuery的插件非常简单,怪不得jQuery插件满天飞,之前是我想复杂了,总觉得写插件是很高深的事情,不知道有没有同感的同学。
动手之前先来做一下需求分析吧(ps:哥是学软件工程出生的学费很坑爹啊,不搞搞需求分析对不起学费啊,呵呵)。
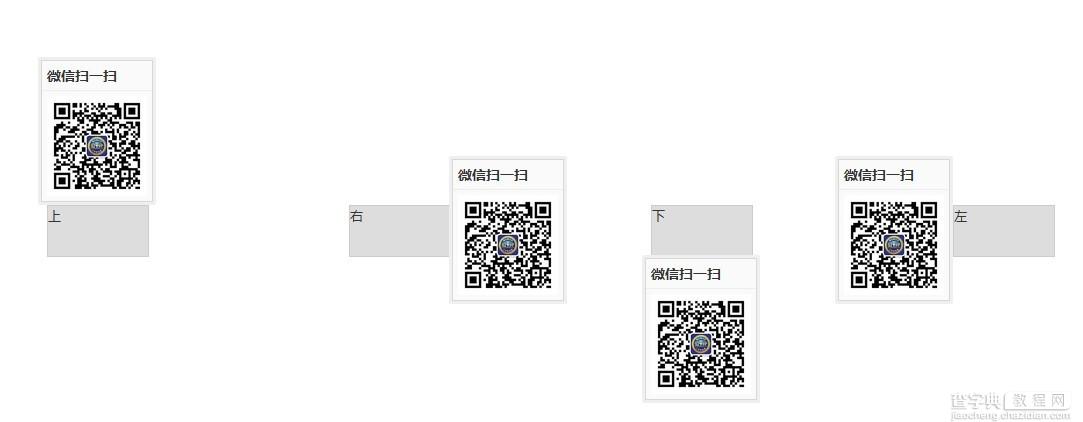
其实也没啥好分析的就是做出如下效果:
鼠标放上去的时候弹出微信扫一扫,微信太火了,老板让网站上放一个,所以哥写了个插件满足一下他,发工资就是上帝,给钱干活,不要给我谈节操,it宅男都是三观尽毁,节操全无的。扯远了。看效果图吧。

使用方法其他jQuery没什么不同:
复制代码 代码如下:
$(function(){
var t = $(".weixin").Tip({
title:'微信扫一扫',
content:'<img src="img/weixin.jpg" width="160px" height="160px;">',
html:true,
direction:'bottom'
});
t.bind({
mouseover:function(){
t.Tip("show");
},
mouseout:function() {
t.Tip("hide");
}
});
});
看一下可配置的选项吧
复制代码 代码如下:
defaultOptions :{
title : '',//标题
content : '',//内容
direction : 'bottom',//弹出反向,相对于选中元素
html : false,//是否允许内容为html元素
template : '<div><div><h3></h3><div></div></div></div>'//弹出框模版
}
最后上高清无码源码有兴趣的看看,没兴趣的ctrl+c,ctrl+v吧
复制代码 代码如下:
!function($){
var Tip = function(element, options){
this.init(element, options);
}
Tip.prototype = {
constructor : Tip,
init : function(element, options){
this.element = $(element);
this.options = $.extend({},this.defaultOptions,options);
},
show : function() {
if (!this.tip) {
this.tip = this.getTip();
var title = this.tip.find("h3"),
container = this.tip.find(".tip-container");
//设置标题
title.text(this.options.title);
//设置内容
if (this.options.html) {
container.html(this.options.content);
} else {
container.text(this.options.content);
}
//添加tip到body
$("body").append(this.tip);
//计算tip的位置
var eLeft = this.element.offset().left,
eTop = this.element.offset().top,
eWidth = this.element.innerWidth(),
eHeight = this.element.innerHeight(),
tipw = this.tip[0].offsetWidth,
tiph = this.tip[0].offsetHeight,
top,
left;
switch(this.options.direction) {
case 'top' :
top = eTop - tiph;
left = (eLeft - tipw/2) + eWidth/2;
this.tip.css({top: top, left: left});
break;
case 'left' :
top = (eTop - tiph/2) + eHeight/2;
left = eLeft - tipw;
this.tip.css({top: top, left: left});
break;
case 'bottom' :
top = eTop + eHeight;
left = (eLeft - tipw/2) + eWidth/2;
this.tip.css({top: top, left: left});
break;
case 'right' :
top = (eTop - tiph/2) + eHeight/2;
left = eLeft + eWidth;
this.tip.css({top: top, left: left});
break;
default:
break;
}
} else {
this.tip.css({display:'block'});
}
},
hide : function() {
this.getTip().css({display:"none"});
},
getTip : function() {
return this.tip ? this.tip : $(this.options.template);
},
detach : function() {
},
defaultOptions :{
title : '',
content : '',
direction : 'bottom',
html : false,
template : '<div><div><h3></h3><div></div></div></div>'
}
}
$.fn.Tip = function(option) {
return this.each(function(){
var e = $(this),
data = e.data('tip'),
options = typeof option == "object" && option;
if (!data) e.data("tip", new Tip(this,options));
if (typeof option == 'string') data[option]();
});
}
}(window.jQuery);
css样式
复制代码 代码如下:
.tip {
position: absolute;
padding: 3px;
background: #efefef;
border-radius: 2px;
top: 0px;
left: 0px;
}
.tip .tip-inner {
background: #fafafb;
border: 1px solid #d8d8d8;
}
.tip .tip-inner h3 {
font-size: 14px;
padding: 5px;
border-bottom: 1px solid #eee;
}
.tip .tip-inner .tip-container {
padding: 5px;
}
以上就是本文的所有内容了,小伙伴们对如何编写jQuery插件是否有了新的 认识了呢,希望大家能够喜欢本文。


