一,开篇分析
大家好哦,大熊君又来了,昨天因为有点个人的事没有写博客,今天又出来了一篇,这篇主要是写一个记事本的小应用,前面的文章,
我也介绍过“Connect”中间件的使用以及“Mongodb”的用法,今天就结合这两个中间件,写个实际的例子,不断完善和重构,已达到
充分学习的目的。好了,废话不说了,直接进入主题。
二,需求分析
(1),用户注册,登录功能(没有涉及很复杂的交互场景,注册时会有用户判断是否已存在)。
(2),用户登录成功,进入笔记管理系统的后台(笔记模块的增删改查功能)。
(3),用户可以具有简单的权限划分(管理员,注册用户)。
(4),界面比较简单,以学习为主。
三,开始设计应用(第一部分)
(1),建立用户登录页面,代码如下:
复制代码 代码如下:
<!doctype html>
<html>
<head>
<title>Bigbear记事本应用登录</title>
<meta content="IE=8" http-equiv="X-UA-Compatible"/>
<meta http-equiv="Content-Type" content="text/html; charset=UTF-8">
<style type="text/css">
.note-title {
margin-bottom : 45px ;
background : #6699cc ;
font-size : 14px ;
font-weight : bold ;
color : #fff;
font-family:arial ;
height : 24px ;
line-height : 24px ;
}
a {
color : #336699;
font-family:arial ;
font-size : 14px ;
font-weight : bold ;
}
</style>
<script src="js/index.js"></script>
</head>
<body>
<div>Bigbear记事本应用登录</div>
<form action="/login" method="post">
<span>用户名:</span><input type="text" name="name" /><br/><br/>
<span>密码:</span><input type="password" name="password" />
<input type="submit" value="登录" />
<a href="reg.html">我要注册</a>
</form>
</body>
</html>
效果图:

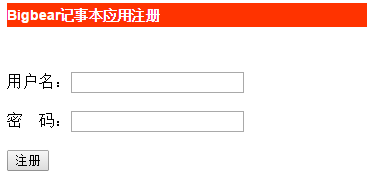
(2),建立用户注册页面,代码如下:
复制代码 代码如下:
<!doctype html>
<html>
<head>
<title>Bigbear记事本应用注册</title>
<meta content="IE=8" http-equiv="X-UA-Compatible"/>
<meta http-equiv="Content-Type" content="text/html; charset=UTF-8">
<style type="text/css">
.note-title {
margin-bottom : 45px ;
background : #ff3300 ;
font-size : 14px ;
font-weight : bold ;
color : #fff;
font-family:arial ;
height : 24px ;
line-height : 24px ;
}
</style>
<script src="js/index.js"></script>
</head>
<body>
<div>Bigbear记事本应用注册</div>
<form action="/reg" method="post">
<span>用户名:</span><input type="text" name="name" /><br/><br/>
<span>密码:</span><input type="password" name="password" /><br/><br/>
<input type="submit" value="注册" />
</form>
</body>
</html>
效果图:

(3),建立“Mongodb”连接代码,如下:
复制代码 代码如下:
var mongodb = require("mongodb") ;
var server = new mongodb.Server("localhost",27017,{
auto_reconnect : true
}) ;
var conn = new mongodb.Db("bb",server,{
safe : true
}) ;
conn.open(function(error,db){
if(error) throw error ;
console.info("mongodb connected !") ;
}) ;
exports = module.exports = conn ;
(4),建立模型实体类“User”,如下:
复制代码 代码如下:
var conn = require("../conn") ;
function User(user){
this.name = user["name"] ;
this.password = user["password"] ;
} ;
User.prototype.save = function(callback){
var that = this ;
conn.collection("users",{
safe : true
},function(error,collection){
if(error) return conn.close() ;
collection.findOne({ // 判断此用户是否存在
name : that.name
},function(error,user){
if(error) return conn.close() ;
if(!user){
collection.insert({
name : that.name + "" ,
password : that.password + ""
},{
safe : true
},function(error,user){
if(error) return conn.close() ;
callback && callback(user) ;
conn.close() ;
}) ;
}
else{
callback("User has registed !") ;
}
}) ;
}) ;
} ;
User.login = function(name,password,callback){
conn.collection("users",{
safe : true
},function(error,collection){
if(error) return conn.close() ;
collection.findOne({
name : name ,
password : password
},function(error,user){
if(error) return conn.close() ;
callback && callback(user) ;
conn.close() ;
}) ;
}) ;
} ;
exports = module.exports = User ;
效果图:

(5),建立应用程序“app”,如下:
复制代码 代码如下:
// app.js
var connect = require("./lib/connect") ;
var user = require("./models/user") ;
var app = connect.createServer() ;
app .use(connect.logger("dev"))
.use(connect.query())
.use(connect.bodyParser())
.use(connect.cookieParser())
.use(connect.static(__dirname + "/views"))
.use(connect.static(__dirname + "/public"))
.use("/login",function(request,response,next){
var name = request.body["name"] ;
var password = request.body["password"] ;
user.login(name,password,function(user){
if(user){
response.end("Welcome to:" + user["name"] + " ^_^ ... ...") ;
}
else{
response.end("User:" + name + " Not Register !") ;
}
}) ;
})
.use("/reg",function(request,response,next){
var name = request.body["name"] ;
var password = request.body["password"] ;
new user({
name : name ,
password : password
}).save(function(user){
if(user && user["name"]){
response.end("User:" + name + "Register Done !") ;
}
else{
response.end("User: " + name + "has registed !") ;
}
}) ;
})
.listen(8888,function(){
console.log("Web Server Running On Port ---> 8888 .") ;
}) ;
说明一下:
(1)“connect.query()”------处理“Get”请求参数解析。
(2)“connect.bodyParser()”------处理“Post”请求参数解析。
(3)“connect.static(__dirname + "/views"),connect.static(__dirname + "/public")”
分别代表模板视图“html”以及静态资源如“js,css,jpg,gif”的资源目录。
以下是这个应用的目录结构:

四,总结一下
(1),掌握NodeJs操作数据库的基本操作语句。
(2),划分层级,如模型,视图,路由。
(3),不断优化和修改本文的例子(比如注册验证用户是否存在,可以独立出“UserManager”做一层代理完成用户验证和保存的动作)。
(4),明天继续完成后续的功能,尽请期待。


