

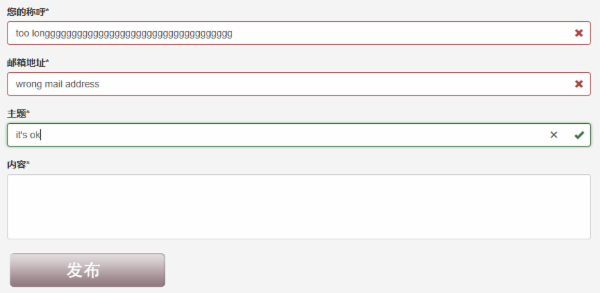
如上图所示,我们需要实现如下这些验证功能:
控件都是必输控件
都需要控制最大长度
第一次打开页面,控件不能显示为错误状态
输入内容再清空后,必输控件需要显示为错误状态
只有所有输入合法后,发布按钮才能变为可用状态
通过AngularJS,我们可以很轻松的实现这些要求,只需要1行JS代码。UI样式这里采用的是Bootstrap。先上示例代码:
HTML。
<!DOCTYPE html> <html lang="zh-cn" ng-app="ftitApp"> <head> <meta charset="utf-8" /> <title>Demo</title> <link href="/Content/bootstrap.css" rel="stylesheet"/> <script src="http://www.jb51.netScripts/angular.js"></script> </head> <body> <div> <> <div> <div> <> <form action="/Contact/Create" method="post" role="form" name="createContactForm" ng-controller="ContactCreateController"> <> <div ng-class="{'has-success' : !createContactForm.UserName.$pristine && createContactForm.UserName.$valid, 'has-error' : !createContactForm.UserName.$pristine && createContactForm.UserName.$invalid }"> <label for="UserName">您的称呼*</label> <input type="text" ng-model="userName" name="UserName" autofocus="" required ng-maxlength=30> <div ng-show="!createContactForm.UserName.$pristine && createContactForm.UserName.$valid"> <span></span> </div> <div ng-show="!createContactForm.UserName.$pristine && createContactForm.UserName.$invalid"> <span></span> </div> </div> <> <div ng-class="{'has-success' : !createContactForm.UserMail.$pristine && createContactForm.UserMail.$valid, 'has-error' : !createContactForm.UserMail.$pristine && createContactForm.UserMail.$invalid }"> <label for="UserMail">邮箱地址*</label> <input type="email" ng-model="userMail" name="UserMail" required ng-maxlength=30> <div ng-show="!createContactForm.UserMail.$pristine && createContactForm.UserMail.$valid"> <span></span> </div> <div ng-show="!createContactForm.UserMail.$pristine && createContactForm.UserMail.$invalid"> <span></span> </div> </div> <> <div ng-class="{'has-success' : !createContactForm.Subject.$pristine && createContactForm.Subject.$valid, 'has-error' : !createContactForm.Subject.$pristine && createContactForm.Subject.$invalid }"> <label for="Subject">主题*</label> <input type="text" ng-model="subject" name="Subject" required ng-maxlength=100> <div ng-show="!createContactForm.Subject.$pristine && createContactForm.Subject.$valid"> <span></span> </div> <div ng-show="!createContactForm.Subject.$pristine && createContactForm.Subject.$invalid"> <span></span> </div> </div> <> <div ng-class="{'has-success' : !createContactForm.Content.$pristine && createContactForm.Content.$valid, 'has-error' : !createContactForm.Content.$pristine && createContactForm.Content.$invalid }"> <label for="Content">内容*</label> <textarea cols="4" rows="5" ng-model="content" name="Content" required ng-maxlength=1000></textarea> <div ng-show="!createContactForm.Content.$pristine && createContactForm.Content.$valid"> <span></span> </div> <div ng-show="!createContactForm.Content.$pristine && createContactForm.Content.$invalid"> <span></span> </div> </div> <> <div> <div ng-show="createContactForm.$valid"> <input type="image" src="http://www.jb51.netContent/images/comment_publish_button.png" onsubmit="submit();" value="发布" ng-disabled='!createContactForm.$valid' /> </div> <div ng-show="!createContactForm.$valid"> <img src="http://www.jb51.netContent/images/invalid_publish_button.png" /> </div> </div> </form> </div> </div> </div> <script src="http://www.jb51.netScripts/ftit/ContactCreateController.js"></script> </body> </html>
JS代码(真的只有一行哟)
ContractCreateController.js
var ftitAppModule = angular.module('ftitApp', []);
这样就好啦。几个关键的地方解释一下:
ng-class:这个标签用来控制class的值。例如ng-class="{'has-success' : !createContactForm.Content.$pristine}的意思就是,如果!createContactForm.Content.$pristine的值为true,class的值就为has-success。
ng-show:控制是否显示该控件。
createContactForm.$valid:全部验证通过后,值为true,否则为false
createContactForm.Content.$valid:标识Content控件是否通过验证,通过为true,否则为false
createContactForm.Content.$pristine:标识Content控件是否从未输入过。从未输入为true,否则为false
更细节的技术问题请查看AngularJS的技术文档。