

一直想做个能帮我过滤出优质文章和博客的平台 给它取了个名 叫Moven。。 把实现它的过程分成了三个阶段:
1. Downloader: 对于指定的url的下载 并把获得的内容传递给Analyser--这是最简单的开始
2. Analyser: 对于接受到的内容,用Regular Expression 或是 XPath 或是 BeautifulSoup/lxml 进行过滤和简化--这部分也不是太难
3. Smart Crawler: 去抓取优质文章的链接--这部分是最难的:
Crawler的话可以在Scrapy Framework的基础上快速的搭建
但是判断一个链接下的文章是不是优质 需要一个很复杂的算法
最近就先从Downloader 和 Analyser 开始: 最近搭了一个l2z story 并且还有一个 Z Life 和 Z Life@Sina 还有一个她的博客 做为一个对Downloader 和 Analyser的练习 我就写了这个东西来监听以上四个站点 并且把它们的内容都同步到这个站上:
http://l2zstory.appspot.com
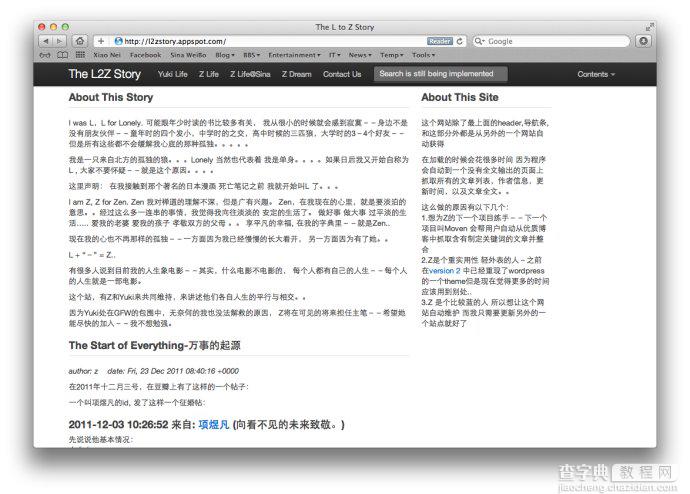
App 的特色
这个站上除了最上面的黑色导航条 和 最右边的About This Site 部分外, 其他的内容都是从另外的站点上自动获得
原则上, 可以添加任何博客或者网站地址到这个东西。。。当然因为这个是L2Z Story..所以只收录了四个站点在里面
特点是: 只要站点的主人不停止更新, 这个东西就会一直存在下去---这就是懒人的力量
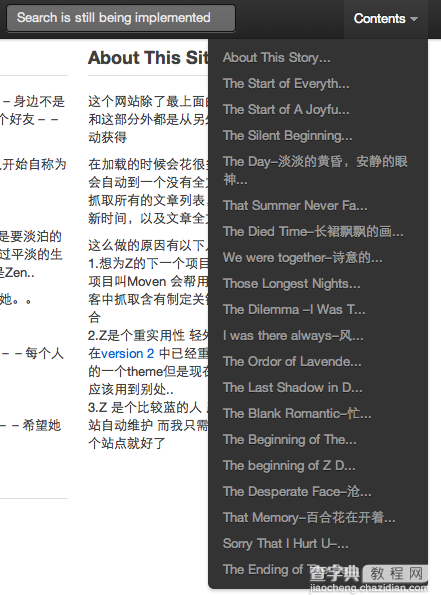
值得一提的是, Content 菜单是在客户端用JavaScript 自动生成的--这样就节约了服务器上的资源消耗
这里用的是html全页面抓取 所以对那些feed没有全文输出的站点来说, 这个app 可以去把它要隐藏的文字抓来
在加载的时候会花很多时间因为程序会自动到一个没有全文输出的页面上抓取所有的文章列表,作者信息,更新时间,以及文章全文。。所以打开的时候请耐心。。。下一步会加入数据存储部分,这样就会快了。。
技术准备
前端:
1. CSS 在信奉简单之上的原则上 twitter的bootstrap.css满足了我大多数的要求 个人超喜欢它的 Grid System
2. Javascript上, 当然选用了jQuery 自从我开始在我的第一个小项目上用了jQuery 后 我就爱上了它 那个动态的目录系统就是用jQuery快速生成的
为了配合bootstrap.css, bootstrap-dropdown.js 也用到了
服务器:
这个app有两个版本:
一个跑在我的Apache上, 但是因为我的网络是ADSL, 所以ip一直会变基本上只是我在我的所谓的局域网内自测用的。。这个版本是纯Django的
另一个跑在Google App Engine上 地址是 http://l2zstory.appspot.com 在把Django 配置到GAE的时候我花了很多功夫才把框架搭起来
详情请见: Using Django with Google App Engine GAE: l2Z Story Setup-Step 1 http://blog.sina.com.cn/s/blog_6266e57b01011mjk.html
后台:
主要语言是Python--不解释, 自从认识Python后就没有离开它
主要用到的module是
1. BeautifulSoup.py 用于html 的解析--不解释
2. feedparser.py 用于对feed xml的解析--网上有很多人说GAE不支持feedparser..这里你们得到答案了。。可以。。这里我也是花了很久才弄明白到底是怎么回事。。总之简单讲就是: 可以用!但是feedparser.py这个文件必须放到跟app.yaml同一个目录中 不然会出现网上众人说的不可以import feedparser的情况
数据库:
Google Datastore: 在下一步中, 这个程序会每隔30分钟醒来 逐一查看各个站点有没有更新并抓取更新后的文章并存入Google 的Datastore中
App 的配置
遵循Google的规则, 配置文件app.yaml 如下:
这里主要是定义了一些static directory--css 和 javascript的所在地
复制代码 代码如下:
application: l2zstory
version: 1
runtime: python
api_version: 1
handlers:
- url: /images
static_dir: l2zstory/templates/template2/images
- url: /css
static_dir: l2zstory/templates/template2/css
- url: /js
static_dir: l2zstory/templates/template2/js
- url: /js
static_dir: l2zstory/templates/template2/js
- url: /.*
script: main.py
URL的配置
这里采用的是Django 里的正则表达式
复制代码 代码如下:
from django.conf.urls.defaults import *
# Uncomment the next two lines to enable the admin:
# from django.contrib import admin
# admin.autodiscover()
urlpatterns = patterns('',
# Example:
# (r'^l2zstory/', include('l2zstory.foo.urls')),
# Uncomment the admin/doc line below and add 'django.contrib.admindocs'
# to INSTALLED_APPS to enable admin documentation:
# (r'^admin/doc/', include('django.contrib.admindocs.urls')),
# Uncomment the next line to enable the admin:
# (r'^admin/(.*)', admin.site.root),
(r'^$','l2zstory.stories.views.L2ZStory'),
(r'^YukiLife/','l2zstory.stories.views.YukiLife'),
(r'^ZLife_Sina/','l2zstory.stories.views.ZLife_Sina'),
(r'^ZLife/','l2zstory.stories.views.ZLife')
)
Views的细节
对Django比较熟悉的人应该会从url的配置中看到view的名字了 我只把L2ZStory的这个view贴出来因为其他的在view里的架构至少是差不多的
复制代码 代码如下:
#from BeautifulSoup import BeautifulSoup
from PyUtils import getAboutPage
from PyUtils import getPostInfos
def L2ZStory(request):
url="feed://l2zstory.wordpress.com/feed/"
about_url="http://l2zstory.wordpress.com/about/"
blog_type="wordpress"
htmlpages={}
aboutContent=getAboutPage(about_url,blog_type)
if aboutContent=="Not Found":
aboutContent="We use this to tell those past stories..."
htmlpages['about']={}
htmlpages['about']['content']=aboutContent
htmlpages['about']['title']="About This Story"
htmlpages['about']['url']=about_url
PostInfos=getPostInfos(url,blog_type,order_desc=True)
return render_to_response('l2zstory.html',
{'PostInfos':PostInfos,
'htmlpages':htmlpages
})
这里主要是构建一个dictionary of dictionary htmlpages 和一个list of dictionary PostInfos
htmlpages 主要是存贮站点的 About, Contact US 之类的页面
PostInfos 会存贮所有文章的 内容, 作者, 发布时间 之类的
这里面最重要的是PyUtils。。这是这个app的核心
PyUtils的细节
我把一些我认为比较重要的细节加深了 并加了评论
复制代码 代码如下:
import feedparser
import urllib2
import re
from BeautifulSoup import BeautifulSoup
header={
'User-Agent':'Mozilla/5.0 (Macintosh; Intel Mac OS X 10.7; rv:8.0.1) Gecko/20100101 Firefox/8.0.1',
}
#用来欺骗网站的后台。。象新浪这类的网站对我们这类的app十分不友好。。。希望它们可以多象被墙掉的wordpress学一学。。
复制代码 代码如下:
timeoutMsg="""
The Robot cannot connect to the desired page due to either of these reasons:
1. Great Fire Wall
2. The Blog Site has block connections made by Robots.
"""
def getPageContent(url,blog_type):
try:
req=urllib2.Request(url,None,header)
response=urllib2.urlopen(req)
html=response.read()
html=BeautifulSoup(html).prettify()
soup=BeautifulSoup(html)
Content=""
if blog_type=="wordpress":
try:
for Sharesection in soup.findAll('div',{'class':'sharedaddy sd-like-enabled sd-sharing-enabled'}):
Sharesection.extract()
for item in soup.findAll('div',{'class':'post-content'}):
Content+=unicode(item)
except:
Content="No Post Content Found"
elif blog_type=="sina":
try:
for item in soup.findAll('div',{'class':'articalContent '}):
Content+=unicode(item)
except:
Content="No Post Content Found"
#对于不同的网站类型 应用不同的过滤器
except:
Content=timeoutMsg
return removeStyle(Content)
def removeStyle(Content):
#add this to remove all the img tag : (<img +(w=".*")>)|(</img>)|(src=".*")|
patn=re.compile(r"(align=".*")|(id=".*")|(class="*")|(style=".*")|(</font>)|(<font.*">)|(<embed +(w*=".*")>)|(</embed>)")
replacepatn=""
Content=re.sub(patn,replacepatn,Content)
#运用正则表达式把抓取的内容中那些格式通通去掉 这样得到的文字比较纯粹
return Content
def getPostInfos(url,blog_type,order_desc=False):
feeds=feedparser.parse(url)
PostInfos=[]
if order_desc:
items=feeds.entries[::-1]
else:
items=feeds.entries
Cnt=0
for item in items:
PostInfo={}
PostInfo['title']=item.title
PostInfo['author']=item.author
PostInfo['date']=item.date
PostInfo['link']=item.link
if blog_type=="wordpress":
Cnt+=1
if Cnt<=8:
PostInfo['description']=getPageContent(item.link,blog_type)
else:
PostInfo['description']=removeStyle(item.description)
elif blog_type=="sina":
PostInfo['description']=removeStyle(item.description)
PostInfos.append(PostInfo)
return PostInfos
template 的概览
在简单之上的原则的鼓舞下, 所有的站点都统一使用一个template 这个template 只接受两个变量--前文中提到的htmlpages 和 PostInfos
重要的片断是:
复制代码 代码如下:
<div>
<a href="{{htmlpages.about.url}}" name="{{htmlpages.about.title}}"><h3>{{htmlpages.about.title}}</h3></a>
</div>
<p>
{{htmlpages.about.content}}
</p>
{%for item in PostInfos%}
<div>
<a href="{{item.link}}" name="{{item.title}}"><h3>{{item.title}}</h3></a>
</div>
<p><i>author: {{item.author}} date: {{item.date}}</i></p>
<p>{{item.description}}</p>
{%endfor%}
</div>
总结
一句话, 我爱死Python了
两句话, 我爱死Python了,我爱死Django了
三句话, 我爱死Python了,我爱死Django了,我爱死jQuery了。。。