

每一个基于java的应用程序都有一个共同工作来展示给用户看到的内容作为工作的应用几个对象。当编写一个复杂的Java应用程序,应用程序类应该尽可能独立其他Java类来增加重复使用这些类,并独立于其他类别的测试它们,而这样做单元测试的可能性。依赖注入(或有时称为布线)有助于粘合这些类在一起,同时保持他们的独立。
考虑有其中有一个文本编辑器组件的应用程序,要提供拼写检查。标准的代码将看起来像这样:
public class TextEditor { private SpellChecker spellChecker; public TextEditor() { spellChecker = new SpellChecker(); } }
我们在这里所做的就是创建文本编辑和拼写检查之间的依赖性。在控制方案中的反转,我们反而会做这样的事情:
public class TextEditor { private SpellChecker spellChecker; public TextEditor(SpellChecker spellChecker) { this.spellChecker = spellChecker; } }
在这里,文本编辑不应该担心拼写检查落实。拼写检查器将独立实施,将提供给文本编辑在文本编辑实例化的时候,这整个过程是由Spring框架的控制。
在这里,我们已经删除从文本编辑的全面控制,并保持它在其他地方(即XML配置文件)和依赖性(即类拼写检查)被注入到类文本编辑通过类构造函数。因此,流程控制已经“倒”通过依赖注入(DI),因为已经有效地委派依赖一些外部系统。
依赖注入的第二种方法是通过文本编辑类,我们将创建拼写检查实例的setter方法,该实例将被用来调用setter方法来初始化文本编辑的属性。
因此,DI主要有两种变体和下面的两个子章将涵盖两者结合实例:
基于构造函数的依赖注入
当容器调用类的构造函数有多个参数,每个代表在其他类中的构造函数依赖关系为基础的DI来完成。
例子:
下面的例子显示了一个类文本编辑TextEditor 只能是依赖注入与构造函数注入。
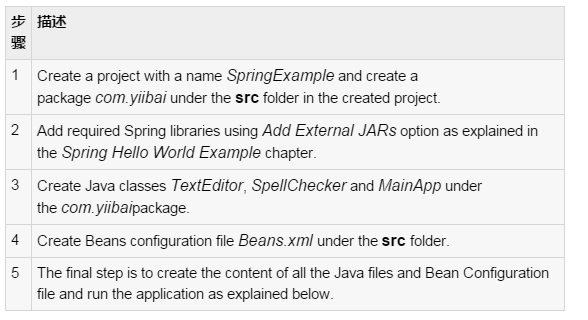
我们使用Eclipse IDE,然后按照下面的步骤来创建一个Spring应用程序:
这里是TextEditor.java文件的内容:
package com.yiibai; public class TextEditor { private SpellChecker spellChecker; public TextEditor(SpellChecker spellChecker) { System.out.println("Inside TextEditor constructor." ); this.spellChecker = spellChecker; } public void spellCheck() { spellChecker.checkSpelling(); } }
下面是另外一个相关的类文件SpellChecker.java内容:
package com.yiibai; public class SpellChecker { public SpellChecker(){ System.out.println("Inside SpellChecker constructor." ); } public void checkSpelling() { System.out.println("Inside checkSpelling." ); } }
以下是MainApp.java文件的内容:
package com.yiibai; import org.springframework.context.ApplicationContext; import org.springframework.context.support.ClassPathXmlApplicationContext; public class MainApp { public static void main(String[] args) { ApplicationContext context = new ClassPathXmlApplicationContext("Beans.xml"); TextEditor te = (TextEditor) context.getBean("textEditor"); te.spellCheck(); } }
以下是配置文件beans.xml文件里面有配置为基于构造函数的注入:
<"1.0" encoding="UTF-8"?> <beans xmlns="http://www.springframework.org/schema/beans" xmlns:xsi="http://www.w3.org/2001/XMLSchema-instance" xsi:schemaLocation="http://www.springframework.org/schema/beans http://www.springframework.org/schema/beans/spring-beans-3.0.xsd"> <> <bean id="textEditor"> <constructor-arg ref="spellChecker"/> </bean> <> <bean id="spellChecker"> </bean> </beans>
创建源代码和bean配置文件完成后,让我们运行应用程序。如果一切顺利将打印以下信息:
Inside SpellChecker constructor. Inside TextEditor constructor. Inside checkSpelling.
构造函数的参数解析:
可能有歧义存在,而将参数传递给构造函数的情况下有一个以上的参数。要解决这种不确定性,其中的构造器参数在一个bean定义中定义的顺序就是这些参数提供给适当的构造函数的顺序。请考虑下面的类:
package x.y; public class Foo { public Foo(Bar bar, Baz baz) { // ... } }
下面的配置工作正常:
<beans> <bean id="foo"> <constructor-arg ref="bar"/> <constructor-arg ref="baz"/> </bean> <bean id="bar"/> <bean id="baz"/> </beans>
让我们检查一个更多情况下我们通过不同类型的构造函数。请考虑下面的类:
package x.y; public class Foo { public Foo(int year, String name) { // ... } }
容器也可以使用类型匹配与简单类型,如果你明确地指定使用type属性的构造函数的参数类型。例如:
<beans> <bean id="exampleBean"> <constructor-arg type="int" value="2001"/> <constructor-arg type="java.lang.String" value="Zara"/> </bean> </beans>
最后,并通过构造函数参数的最佳方法,使用索引属性来显式地指定一个构造器参数的索引。这里的索引是从0开始。例如:
<beans> <bean id="exampleBean"> <constructor-arg index="0" value="2001"/> <constructor-arg index="1" value="Zara"/> </bean> </beans>
最后需要说明的,如果你传递一个引用到一个对象,需要使用<constructor-arg>标签的ref属性,如果是直接传递一个值,那么应该使用value属性。
基于setter方法的依赖注入
基于setter DI由容器调用setter方法对bean调用无参构造器或无参static工厂方法实例化bean之后完成。
这里是TextEditor.java文件的内容:
package com.yiibai; public class TextEditor { private SpellChecker spellChecker; // a setter method to inject the dependency. public void setSpellChecker(SpellChecker spellChecker) { System.out.println("Inside setSpellChecker." ); this.spellChecker = spellChecker; } // a getter method to return spellChecker public SpellChecker getSpellChecker() { return spellChecker; } public void spellCheck() { spellChecker.checkSpelling(); } }
在这里,需要检查setter方法的命名约定。设置我们使用setSpellChecker()方法,这是非常类似于Java POJO类的变量的拼写检查器。让我们创造另一个相关的类文件SpellChecker.java,内容如下:
package com.yiibai; public class SpellChecker { public SpellChecker(){ System.out.println("Inside SpellChecker constructor." ); } public void checkSpelling() { System.out.println("Inside checkSpelling." ); } }
以下是MainApp.java文件的内容:
package com.yiibai; import org.springframework.context.ApplicationContext; import org.springframework.context.support.ClassPathXmlApplicationContext; public class MainApp { public static void main(String[] args) { ApplicationContext context = new ClassPathXmlApplicationContext("Beans.xml"); TextEditor te = (TextEditor) context.getBean("textEditor"); te.spellCheck(); } }
以下是配置文件beans.xml文件里面有配置为基于setter方法注入:
<"1.0" encoding="UTF-8"?> <beans xmlns="http://www.springframework.org/schema/beans" xmlns:xsi="http://www.w3.org/2001/XMLSchema-instance" xsi:schemaLocation="http://www.springframework.org/schema/beans http://www.springframework.org/schema/beans/spring-beans-3.0.xsd"> <> <bean id="textEditor"> <property name="spellChecker" ref="spellChecker"/> </bean> <> <bean id="spellChecker"> </bean> </beans>
应该注意在基于构造函数注入和setter注入定义beans.xml文件的差异。唯一的区别是,我们已经使用<constructor-arg>标签为基于构造函数的注入和的<property>标签为基于setter注入的<bean>元素内。
需要注意的第二个重要的一点是,如果传递一个引用到一个对象,需要使用<property>标签的ref属性,如果是直接传递一个值,那么应该使用value属性。
创建源代码和bean配置文件完成后,让我们运行应用程序。如果一切顺利,这将打印以下信息:
Inside SpellChecker constructor. Inside setSpellChecker. Inside checkSpelling.
采用p名称空间的XML配置:
如果你有很多的setter方法则可以很方便地使用p名称空间的XML配置文件中。让我们查看他们的区别:
让我们来用的<property>标签标准的XML配置文件的例子:
<"1.0" encoding="UTF-8"?> <beans xmlns="http://www.springframework.org/schema/beans" xmlns:xsi="http://www.w3.org/2001/XMLSchema-instance" xsi:schemaLocation="http://www.springframework.org/schema/beans http://www.springframework.org/schema/beans/spring-beans-3.0.xsd"> <bean id="john-classic"> <property name="name" value="John Doe"/> <property name="spouse" ref="jane"/> </bean> <bean name="jane"> <property name="name" value="John Doe"/> </bean> </beans>
上面的XML配置可重写使用 p-namespace如下一个简洁的方法:
<"1.0" encoding="UTF-8"?> <beans xmlns="http://www.springframework.org/schema/beans" xmlns:xsi="http://www.w3.org/2001/XMLSchema-instance" xmlns:p="http://www.springframework.org/schema/p" xsi:schemaLocation="http://www.springframework.org/schema/beans http://www.springframework.org/schema/beans/spring-beans-3.0.xsd"> <bean id="john-classic" p:name="John Doe" p:spouse-ref="jane"/> </bean> <bean name="jane" p:name="John Doe"/> </bean> </beans>
在这里,不应该在指定原始值和对空间对象引用的区别。-ref部分表示,这不是直链的值,而是一个引用到另一个bean中。