1.验证码的生成,我们能够看到是用Graphics对象画出来的。对象我们必须要获得Graphics对象
1-1、Graphics对象的获取,要通过BufferedImage获得
<span>int width=100;//确定框框的大小 int height=40; BufferedImage bfi =new BufferedImage(width, height, BufferedImage.TYPE_INT_RGB); Graphics g=bfi.getGraphics();//获得Graphics对象就可以画图</span>
1-2、一般的验证码背景框都是白色的
<span> //1,设置背景(白框框) g.setColor(Color.WHITE);//白色的画笔 g.fillRect(0, 0, width, height);//画矩形矩形框框</span>
1-3、保存数据(后台验证使用)和设置字体样式(美观)
String str="";//保存数据 Random rom=new Random(); //设置字体的大写与粗 g.setFont(new Font("a", Font.BOLD,20));
1-4、生成具体的数值,以及随机生成的颜色
for(int i=0;i<4;i++){ int num=rom.nextInt(10);//生成的随机数 g.setColor(new Color(rom.nextInt(256),rom.nextInt(256), rom.nextInt(256)));//设置画笔的颜色(随机) g.drawString(""+num, 20*i, 20+rom.nextInt(10));//画出线,x的位置每一之间增加20,y的坐标以20一条线,在线上或者是线下 //PS:位置需要明确些, }
1-5、一般的数字容易被其他软件直接识别出来,为了防黑。稍微加一点干扰线
//画出一些干扰线 for (int i = 0; i < 10; i++) { g.setColor(new Color(rom.nextInt(256),rom.nextInt(256), rom.nextInt(256)));//设置画笔的颜色(随机) g.drawLine(rom.nextInt(100),rom.nextInt(40), rom.nextInt(100), rom.nextInt(40));//位置也是随机,x,y的值不要超过矩形框框 }
1-6、销毁Graphics对象和存储图片
<span> </span>g.dispose();//销毁对象 ImageIO.write(bfi, "JPEG", res.getOutputStream());//图片用字节流 直接得到 PS::: res是Servlet里面的。
这样验证码就生成了,那我们如何导入到前台去呢
2、具体实现
前台代码呈现():
<body> <h1>用户登录</h1><br/> 用户名:<input type="text" name="nametext"/><br/> 密 码:<input type="text" name="psd"/><br/> 请输入验证码:<input type="text"/> <img <span>src="/IMG/immg" </span>id="aid"/><a href="javascript:flush()" >看不清</a> </body>
src的地址来源就是从后台发过来的。路径是很有意思的。
2-1步骤
项目里面
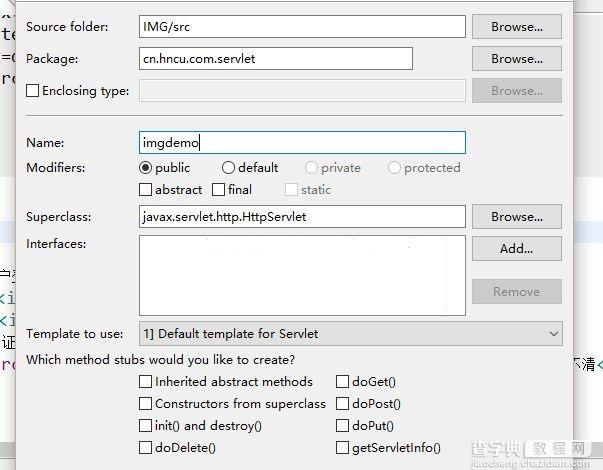
myeclipse --> src -->new Servlet 出现如下:

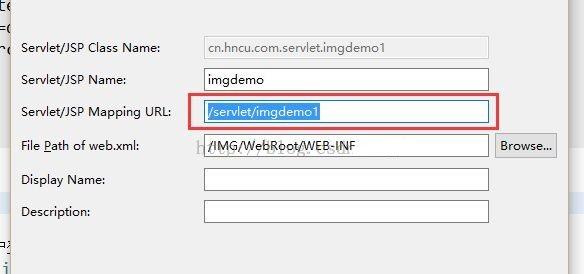
点击----》next 出现如下页面:

这个配置会自动到项目里面的web-INF文件夹里面web.xml。这个框框里面的值就是前台 src里面写的需要访问的路径,----> 点击完成就行了。
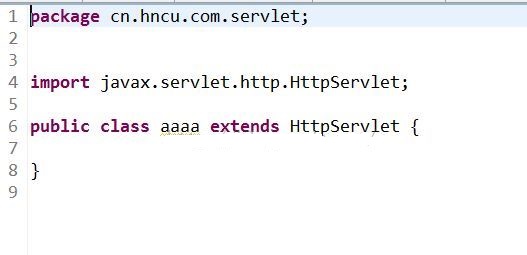
自动了。生成如下界面:

在这里就可写之前的代码。但是需要注意,我们必须通过覆盖这个方法才能有效:
protected void service(HttpServletRequest req, HttpServletResponse resp)//自动生成 输入 <span>service 补全,自动生成</span> throws ServletException, IOException { // TODO Auto-generated method stub super.service(req, resp); }
具体的代码如下:
package cn.hncu.com.servlet; import java.awt.Color; import java.awt.Font; import java.awt.Graphics; import java.awt.image.BufferedImage; import java.io.FileOutputStream; import java.io.IOException; import java.util.Random; import javax.imageio.ImageIO; import javax.servlet.ServletException; import javax.servlet.ServletRequest; import javax.servlet.ServletResponse; import javax.servlet.http.HttpServlet; import javax.servlet.http.HttpServletRequest; import javax.servlet.http.HttpServletResponse; public class Imgdemo extends HttpServlet { @Override public void service(ServletRequest req, ServletResponse res) throws ServletException, IOException { int width=100;//确定框框的大小 int height=40; BufferedImage bfi =new BufferedImage(width, height, BufferedImage.TYPE_INT_RGB); Graphics g=bfi.getGraphics();//获得Graphics对象就可以画图 //1,设置背景(白框框) g.setColor(Color.WHITE);//白色的画笔 g.fillRect(0, 0, width, height);//画矩形矩形框框 //2,具体生成随机数 String str="";//保存数据 Random rom=new Random(); //设置字体的大写与粗 g.setFont(new Font("a", Font.BOLD,20)); //画出具体的图片 for(int i=0;i<4;i++){ int num=rom.nextInt(10);//生成的随机数 g.setColor(new Color(rom.nextInt(256),rom.nextInt(256), rom.nextInt(256)));//设置画笔的颜色(随机) g.drawString(""+num, 20*i, 20+rom.nextInt(10));//画出线,x的位置每一之间增加20,y的坐标以20一条线,在线上或者是线下 //PS:位置需要明确些, } //画出一些干扰线 for (int i = 0; i < 10; i++) { g.setColor(new Color(rom.nextInt(256),rom.nextInt(256), rom.nextInt(256)));//设置画笔的颜色(随机) g.drawLine(rom.nextInt(100),rom.nextInt(40), rom.nextInt(100), rom.nextInt(40));//位置也是随机,x,y的值不要超过矩形框框 } g.dispose(); ImageIO.write(bfi, "JPEG", res.getOutputStream());//图片用字节流 直接得到 } }<span> </span>
前台代码:
<%@ page language="java" import="java.util.*" pageEncoding="UTF-8"%> <% String path = request.getContextPath(); String basePath = request.getScheme()+"://"+request.getServerName()+":"+request.getServerPort()+path+"/"; %> <!DOCTYPE HTML PUBLIC "-//W3C//DTD HTML 4.01 Transitional//EN"> <html> <head> <base href="<%=basePath%>"> <title>My JSP 'img.jsp' starting page</title> <meta http-equiv="pragma" content="no-cache"> <meta http-equiv="cache-control" content="no-cache"> <meta http-equiv="expires" content="0"> <meta http-equiv="keywords" content="keyword1,keyword2,keyword3"> <meta http-equiv="description" content="This is my page"> <!-- <link rel="stylesheet" type="text/css" href="styles.css"> --> <script type="text/javascript"> function flush(){ var text=document.getElementById("aid"); var date =new Date(); var tt=date.getTime(); text.src="/IMG/immg"+tt; } </script> </head> <body> <h1>用户登录</h1><br/> 用户名:<input type="text" name="nametext"/><br/> 密 码:<input type="text" name="psd"/><br/> 请输入验证码:<input type="text"/> <img src="http://www.jb51.netIMG/immg" id="aid"/><a href="javascript:flush()" >看不清</a> </body> </html>
对于前台代码需要解释一下:
当我们的的验证码传过来看不清的时候需要刷新,而浏览器有自动记忆的功能,当没有新的参数传进来的时候,浏览器是不会刷新的,所以我们需要手动的去写一个js控制参数传,我们知道,只有时间是不会变化的,所有我们采用时间来作为参数传递。
PS:自己坑了一段时间的问题:验证码的路径问题。前端的“/”表示 tomcat目录,在项目内部,如web.xml中“/”表示该项目下。也就是说,他们两个的目录差了一层。
最后附上自己在测试的时候的代码以及修改数字形状的问题,如改成2D的效果更不错。都有很明显的记录。
package cn.hncu.com; import java.awt.Color; import java.awt.Font; import java.awt.Graphics; import java.awt.Graphics2D; import java.awt.geom.AffineTransform; import java.awt.image.BufferedImage; import java.io.FileNotFoundException; import java.io.FileOutputStream; import java.io.IOException; import java.util.Random; import javax.imageio.ImageIO; import org.junit.Test; public class Demoimg { @Test public void Test() throws Exception{ String str="9988"; int width=60; int height=30; //通过bufferedImage对象获得Graphics对象 BufferedImage bfi=new BufferedImage(width, height, BufferedImage.TYPE_INT_BGR); Graphics g=bfi.getGraphics(); g.drawString(str, 10,10); g.dispose();//类似于IO中的关流 ImageIO.write(bfi , "JPEG", new FileOutputStream("F:exa.jpg")); //bfi为画布,将画布写到文件中JPEG为指定文件格式 } @Test public void Test2() throws Exception{ int width=100; int height=40; BufferedImage bfi =new BufferedImage(width, height, BufferedImage.TYPE_INT_RGB); Graphics g=bfi.getGraphics();//获得Graphics对象就可以画图 //1,设置背景(白框框) g.setColor(Color.WHITE);//白色的画笔 g.fillRect(0, 0, width, height); //2,具体生成随机数 String str="";//保存数据 Random rom=new Random(); //设置字体的大写与粗 g.setFont(new Font("a", Font.BOLD,20)); //画出具体的图片 for(int i=0;i<4;i++){ int num=rom.nextInt(10);//生成的随机数 g.setColor(new Color(rom.nextInt(256),rom.nextInt(256), rom.nextInt(256)));//设置画笔的颜色(随机) g.drawString(""+num, 20*i, 20+rom.nextInt(10));//画出线,x的位置每一之间增加20,y的坐标以20一条线,在线上或者是线下 //PS:位置需要明确些, } //画出一些干扰线 for (int i = 0; i < 10; i++) { g.setColor(new Color(rom.nextInt(256),rom.nextInt(256), rom.nextInt(256)));//设置画笔的颜色(随机) g.drawLine(rom.nextInt(100),rom.nextInt(40), rom.nextInt(100), rom.nextInt(40));//位置也是随机,x,y的值不要超过矩形框框 } g.dispose(); ImageIO.write(bfi, "JPEG", new FileOutputStream("F:exb.jpg")); } //画出可以变化的情况 //字体能够旋转的验证码 @Test public void Test3() throws IOException{ int width=100; int height=40; BufferedImage bfi =new BufferedImage(width, height, BufferedImage.TYPE_INT_RGB); Graphics g=bfi.getGraphics(); Graphics2D g2d=(Graphics2D) g; Random rom =new Random(); g2d.setColor(Color.WHITE);//设置画笔的颜色 g2d.fillRect(0, 0, width, height);//画出一个白色的矩形 g2d.setFont(new Font("a", Font.BOLD, 20)); for(int i=0;i<4;i++){ int num=rom.nextInt(10); //旋转,放缩 AffineTransform aff=new AffineTransform(); //aff.rotate(Math.random(), i*18, height-20);//旋转 aff.scale(0.6+Math.random(), 0.6+Math.random());//缩放 g2d.setColor(new Color(rom.nextInt(256),rom.nextInt(256),rom.nextInt(256))); g2d.setTransform(aff); g2d.drawString(""+num, i*18, height-25); } g2d.dispose(); ImageIO.write(bfi, "JPEG", new FileOutputStream("F:exc.jpg")); } }
以上就是关于java生成验证码的基本流程,还附带了自己亲自的测试的代码,希望这些都能帮到大家。


