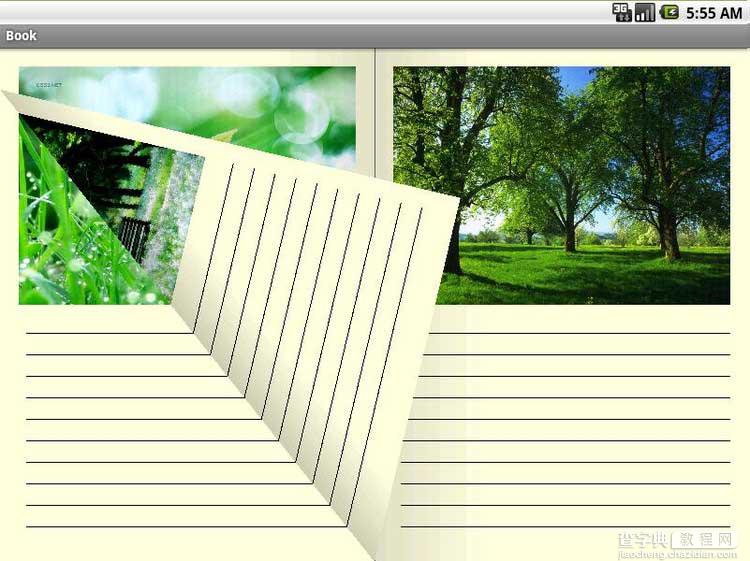
本文实例讲述了Android自定义控件eBook实现翻书效果的方法。分享给大家供大家参考,具体如下:
效果图:


Book.java文件:
package com.book; import android.app.Activity; import android.os.Bundle; import android.util.Log; import android.view.View; import android.widget.ImageView; public class Book extends Activity { /** Called when the activity is first created. */ eBook mBook; public void onCreate(Bundle savedInstanceState) { super.onCreate(savedInstanceState); setContentView(R.layout.main); mBook = (eBook)findViewById(R.id.my_book); mBook.addLayoutRecForPage(R.layout.page,21); mBook.setListener(new eBook.Listener() { public void onPrevPage() { updateContent(); } public void onNextPage() { updateContent(); } public void onInit() { updateContent(); } }); } private void updateContent(){ int index = mBook.getIndexForLeftPage(); View left = mBook.getLeftPage(),right = mBook.getRightPage(); View next1 = mBook.getNextPage1(),next2 = mBook.getNextPage2(); View prev1 = mBook.getPrevPage1(),prev2 = mBook.getPrevPage2(); if(left != null)setImg(left,index); if(right != null)setImg(right,index+1); if(next1 != null)setImg(next1,index+2); if(next2 != null)setImg(next2,index+3); if(prev1 != null)setImg(prev1,index-1); if(prev2 != null)setImg(prev2,index-2); mBook.invalidate(); } private void setImg(View v , int index){ if(index >= 0 && index < 20){ ImageView img = (ImageView)v.findViewById(R.id.book_img); if(img == null)return; Log.d("eBook","set Img"); switch(index%6){ case 0: img.setImageResource(R.drawable.p1); break; case 1: img.setImageResource(R.drawable.p2); break; case 2: img.setImageResource(R.drawable.p3); break; case 3: img.setImageResource(R.drawable.p4); break; case 4: img.setImageResource(R.drawable.p5); break; case 5: img.setImageResource(R.drawable.p6); break; default: break; } } } }
main.xml文件:
<"1.0" encoding="utf-8"?> <LinearLayout xmlns:android="http://schemas.android.com/apk/res/android" android:orientation="vertical" android:layout_width="fill_parent" android:layout_height="fill_parent"> <com.book.eBook android:id="@+id/my_book" android:layout_width="fill_parent" android:layout_height="fill_parent"/> </LinearLayout>
page.xml文件:
<"1.0" encoding="utf-8"?> <LinearLayout xmlns:android="http://schemas.android.com/apk/res/android" android:orientation="vertical" android:layout_width="fill_parent" android:layout_height="fill_parent" android:padding="20dip" android:background="#FFFFDD"> <ImageView android:layout_width="fill_parent" android:id="@+id/book_img" android:layout_height="fill_parent" android:layout_weight="1" android:scaleType="fitXY" android:src="http://wallage.blog.163.com/blog/@drawable/p1"/> <com.book.TelEdit android:id="@+id/book_text" android:layout_width="fill_parent" android:background="#ffffdd" android:gravity="top" android:typeface="sans" android:capitalize="sentences" android:lineSpacingExtra="5dip" android:textSize="15dip" android:textColor="#000000" android:layout_height="fill_parent" android:paddingTop="30dip" android:layout_weight="1"/> </LinearLayout>
控件TelEdit.java代码:
package com.book; import android.content.Context; import android.graphics.Canvas; import android.graphics.Color; import android.graphics.Paint; import android.util.AttributeSet; import android.view.WindowManager; import android.widget.EditText; public class TelEdit extends EditText { Context mContext; public TelEdit(Context context) { super(context); mContext = context; } public TelEdit(Context context, AttributeSet attrs) { super(context, attrs); mContext = context; } public TelEdit(Context context, AttributeSet attrs, int defStyle) { super(context, attrs, defStyle); mContext = context; } protected void onDraw(Canvas canvas) { WindowManager wm = (WindowManager) mContext.getSystemService("window"); int windowWidth = wm.getDefaultDisplay().getWidth(); int windowHeight = wm.getDefaultDisplay().getHeight(); Paint paint = new Paint(); paint.setStyle(Paint.Style.FILL); paint.setColor(Color.BLACK); int paddingTop = getPaddingTop(); int paddingBottom = getPaddingBottom(); int scrollY = getScrollY(); int scrollX = getScrollX() + windowWidth; int innerHeight = scrollY + getHeight() - paddingBottom; int lineHeight = getLineHeight(); int baseLine = scrollY + (lineHeight - ((scrollY - paddingTop) % lineHeight)); int x = 8; while (baseLine < innerHeight) { canvas.drawLine(x, baseLine, scrollX - x, baseLine, paint); baseLine += lineHeight; } super.onDraw(canvas); } }
eBook.java文件部分代码:
package com.book; import java.util.ArrayList; import java.util.Date; import java.util.List; import android.content.Context; import android.graphics.Bitmap; import android.graphics.Canvas; import android.graphics.Color; import android.graphics.LinearGradient; import android.graphics.Paint; import android.graphics.Path; import android.graphics.Point; import android.graphics.PorterDuffXfermode; import android.graphics.Shader; import android.graphics.PorterDuff.Mode; import android.util.AttributeSet; import android.util.Log; import android.view.GestureDetector; import android.view.LayoutInflater; import android.view.MotionEvent; import android.view.View; import android.view.GestureDetector.OnGestureListener; import android.widget.FrameLayout; import android.widget.LinearLayout; public class eBook extends FrameLayout{ public static final String LOG_TAG = "eBook"; List<Integer> myRecPages; int totalPageNum; Context mContext; boolean hasInit = false; final int defaultWidth = 600 , defaultHeight = 400; int contentWidth = 0; int contentHeight = 0; View leftPage,rightPage,llPage,lrPage,rrPage,rlPage; LinearLayout mView; bookView mBookView; boolean closeBook = false; private enum Corner { LeftTop, RightTop, LeftBottom, RightBottom, None }; private Corner mSelectCorner; final int clickCornerLen = 250*250; //50dip float scrollX = 0,scrollY = 0; int indexPage = 0; private enum State { ABOUT_TO_ANIMATE, ANIMATING, ANIMATE_END, READY, TRACKING }; private State mState; private Point aniStartPos; private Point aniStopPos; private Date aniStartTime; private long aniTime = 2000; private long timeOffset = 900; Listener mListener; private GestureDetector mGestureDetector; private BookOnGestureListener mGestureListener; public eBook(Context context) { super(context); Init(context); } public eBook(Context context, AttributeSet attrs) { super(context, attrs); Init(context); } ...省略 }
该控件大致实现方法:
eBook继承FrameLayout,好处在于FrameLayout有图层效果,后添加的View类能覆盖前面的View。
初始化:定义一个LinearLayout的成员变量mView,将page.xml inflate 成View分别用leftPage,rightPage引用,并初始化其数据,将leftPage,rightPage通过addView添加到mView,然后将mView添加到eBook。在eBook里定义一个私有类BookView extends View。 并定义成员变量 BookView mBookView; 最后将mBookView添加的eBook中,这样,mView中的内容为书面内容,mBookView中的内容为特效内容。
后续手势动作:可将各种手势的特效动作画于mBookView的画布中。
希望本文所述对大家Android程序设计有所帮助。


