

写在前面
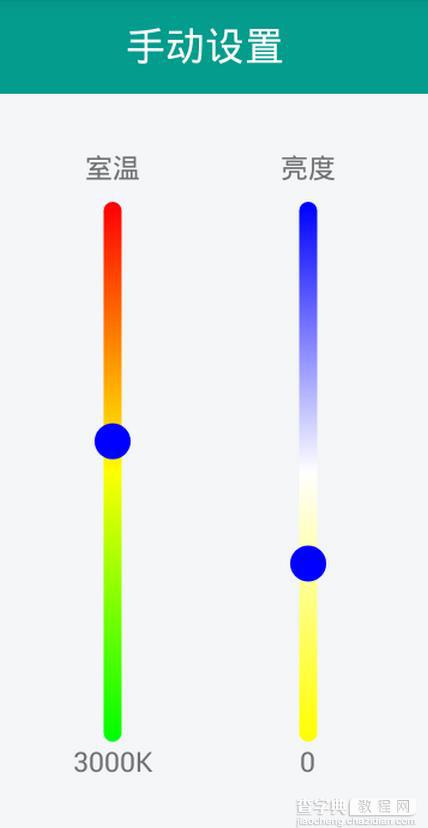
因为有这样的一个场景,需要实现竖直方向的多色进度条,然后在网上也找了下,没看到符合需要的,于是自定义了一个,效果如下:
具体实现
本来想定义水平的,然后旋转一下,后来发现还不如直接定义竖直方向来的直接,就直接在竖直方向画了下。
首先讲一下思路,就是通过继承View,然后通过onDraw()方法进行绘制。具体绘制的时候,需要处理一些小细节。
比如,我们需要画一个圆形的滑动块,那么我们的背景色带就不能把整个宽度占满,要不然,小圆块只能和色带一样宽了,效果不是很好看,所以在绘制的时候应该把背景画的宽度小于View的实际宽度。
接下来我要贴代码了:
@Override protected void onDraw(Canvas canvas) { super.onDraw(canvas); int h = getMeasuredHeight(); int w = getMeasuredWidth(); mRadius = (float) w/2; sLeft = w * 0.25f; // 背景左边缘坐标 sRight = w * 0.75f;// 背景右边缘坐标 sTop = 0; sBottom = h; sWidth = sRight - sLeft; // 背景宽度 sHeight = sBottom - sTop; // 背景高度 x = (float) w/2;//圆心的x坐标 y = (float) (1-0.01*progress)*sHeight;//圆心y坐标 drawBackground(canvas); drawCircle(canvas); paint.reset(); }
再看下画背景:
private void drawBackground(Canvas canvas){ RectF rectBlackBg = new RectF(sLeft, sTop, sRight, sBottom); linearGradient=new LinearGradient(sLeft,sTop,sWidth,sHeight,colorArray,null, Shader.TileMode.MIRROR); paint.setAntiAlias(true); paint.setStyle(Paint.Style.FILL); //设置渲染器 paint.setShader(linearGradient); canvas.drawRoundRect(rectBlackBg, sWidth/2, sWidth/2, paint); }
这里使用LinearGradient实现多种颜色渐变,默认初始化定义如下:
private int endColor=Color.WHITE; private int thumbColor=Color.BLACK; private int thumbBorderColor=Color.WHITE; private int colorArray[]={startColor, middleColor, endColor};
然后看下画圆的操作:
private void drawCircle(Canvas canvas){ Paint thumbPaint = new Paint(); y = y < mRadius ? mRadius : y;//判断thumb边界 y = y > sHeight-mRadius ? sHeight-mRadius : y; thumbPaint.setAntiAlias(true); thumbPaint.setStyle(Paint.Style.FILL); thumbPaint.setColor(thumbColor); canvas.drawCircle(x, y, mRadius, thumbPaint); thumbPaint.setStyle(Paint.Style.STROKE); thumbPaint.setColor(thumbBorderColor); thumbPaint.setStrokeWidth(2); canvas.drawCircle(x, y, mRadius, thumbPaint); }
这里通过画布画了一个圆形,内部填充和外边沿。
上面的过程已经可以使效果展示出来了,但是无法操作,我们还需要给它加上事件才行:
@Override public boolean onTouchEvent(MotionEvent event) { this.y = event.getY(); progress= (sHeight-y)/sHeight*100; switch(event.getAction()) { case MotionEvent.ACTION_DOWN: break; case MotionEvent.ACTION_UP: if (onStateChangeListener!=null){ onStateChangeListener.onStopTrackingTouch(this, progress); } break; case MotionEvent.ACTION_MOVE: if (onStateChangeListener!=null){ onStateChangeListener.OnStateChangeListener(this, progress); } setProgress(progress); this.invalidate(); break; } return true; } public interface OnStateChangeListener{ void OnStateChangeListener(View view, float progress); void onStopTrackingTouch(View view, float progress); } public void setOnStateChangeListener(OnStateChangeListener onStateChangeListener){ this.onStateChangeListener=onStateChangeListener; }
这里写了个回调接口,然后我们在Activity中就可以接收到相应的滑动进度,进而进行操作,当然,这里我们还得再加一个方法,以便改变seekbar的状态:
public void setProgress(float progress) { this.progress = progress; invalidate(); }
到这里,功能基本就OK了,然后我们可以在Activity中去使用它了,下面是布局中的引用:
<"1.0" encoding="utf-8"?> <LinearLayout xmlns:android="http://schemas.android.com/apk/res/android" android:orientation="vertical" android:layout_width="match_parent" android:layout_height="match_parent" android:background="@color/bgColor" > <include layout="@layout/bar_simple_title" /> <LinearLayout android:layout_width="match_parent" android:layout_height="match_parent" android:orientation="horizontal" android:gravity="center" > <RelativeLayout android:layout_marginTop="20dp" android:layout_width="wrap_content" android:layout_height="match_parent" android:layout_marginRight="35dp" > <TextView android:id="@+id/tv_inner_temper" android:layout_width="wrap_content" android:layout_height="wrap_content" android:text="@string/inner_temperature" android:layout_centerHorizontal="true" /> <com.tfxiaozi.widget.VerticalColorSeekBar android:id="@+id/vpb_inner_temper" android:layout_width="20dp" android:layout_height="300dp" android:layout_centerHorizontal="true" android:layout_marginTop="30dp"/> <TextView android:id="@+id/tv_current_temper" android:layout_below="@id/vpb_inner_temper" android:layout_width="wrap_content" android:layout_height="wrap_content" android:text="@string/current_temperature" /> </RelativeLayout> <RelativeLayout android:layout_marginLeft="35dp" android:layout_marginTop="20dp" android:layout_width="wrap_content" android:layout_height="match_parent" > <TextView android:id="@+id/tv_brightness" android:layout_width="wrap_content" android:layout_height="wrap_content" android:text="@string/brightness" android:layout_centerHorizontal="true" /> <com.tfxiaozi.widget.VerticalColorSeekBar android:id="@+id/vpb_brightness" android:layout_width="20dp" android:layout_height="300dp" android:layout_centerHorizontal="true" android:layout_marginTop="30dp"/> <TextView android:id="@+id/tv_current_brightness" android:layout_below="@id/vpb_brightness" android:layout_width="wrap_content" android:layout_height="wrap_content" android:layout_centerHorizontal="true" android:text="0" /> </RelativeLayout> </LinearLayout> </LinearLayout>
怎么使用就很简单了:
package com.tfxiaozi.activity.setting; import android.graphics.Color; import android.os.Bundle; import android.view.View; import android.widget.ImageView; import android.widget.TextView; import com.tfxiaozi.R; import com.tfxiaozi.activity.BaseActivity; import com.tfxiaozi.utils.ToastUtils; import com.tfxiaozi.widget.VerticalColorSeekBar; /** * Created by dongqiang on 2016/10/16. */ public class ManualSettingActivity extends BaseActivity implements View.OnClickListener, VerticalColorSeekBar.OnStateChangeListener { private TextView tvCurrentTemper, tvCurrentBrightness, tvMainTitle; private ImageView ivBack; private VerticalColorSeekBar vpbInnerTemper; private VerticalColorSeekBar vpbBrightness; @Override protected void onCreate(Bundle savedInstanceState) { super.onCreate(savedInstanceState); setContentView(R.layout.activity_manual_setting); initViews(); initEvents(); initData(); } private void initViews() { tvMainTitle = (TextView) findViewById(R.id.title_main_text); tvMainTitle.setText(getString(R.string.manual_setting)); tvMainTitle.setVisibility(View.VISIBLE); ivBack = (ImageView) findViewById(R.id.title_back); ivBack.setVisibility(View.VISIBLE); tvCurrentTemper = (TextView) findViewById(R.id.tv_current_temper); tvCurrentBrightness = (TextView) findViewById(R.id.tv_current_brightness); vpbInnerTemper = (VerticalColorSeekBar)findViewById(R.id.vpb_inner_temper); vpbBrightness = (VerticalColorSeekBar) findViewById(R.id.vpb_brightness); vpbInnerTemper.setColor(Color.RED, Color.YELLOW, Color.GREEN, Color.BLUE, Color.TRANSPARENT); vpbBrightness.setColor(Color.BLUE, Color.WHITE, Color.YELLOW, Color.BLUE, Color.TRANSPARENT); } private void initEvents() { ivBack.setOnClickListener(this); vpbInnerTemper.setOnStateChangeListener(this); vpbBrightness.setOnStateChangeListener(this); } private void initData() { vpbInnerTemper.setProgress(50); vpbBrightness.setProgress(70); } @Override public void onClick(View v) { switch (v.getId()) { case R.id.title_back: finish(); break; } } @Override public void OnStateChangeListener(View view, float progress) { } @Override public void onStopTrackingTouch(View view, float progress) { int viewId = view.getId(); switch (viewId) { case R.id.vpb_inner_temper: if (progress < 0) { progress = 0; } if(progress > 100) { progress = 100; } ToastUtils.showShort(this, "progress= " + progress); break; case R.id.vpb_brightness: if (progress < 0) { progress = 0; } if(progress > 100) { progress = 100; } ToastUtils.showShort(this, "progress1= " + progress); break; } } }
到这里就结束了,最后还是附上自定义View的整个代码吧:
package com.tfxiaozi.widget; import android.content.Context; import android.graphics.Canvas; import android.graphics.Color; import android.graphics.LinearGradient; import android.graphics.Paint; import android.graphics.RectF; import android.graphics.Shader; import android.util.AttributeSet; import android.util.Log; import android.view.MotionEvent; import android.view.View; /** * Created by dongqiang on 2016/10/21. */ public class VerticalColorSeekBar extends View{ private static final String TAG = VerticalColorSeekBar.class.getSimpleName(); private int startColor= Color.BLACK; private int middleColor = Color.GRAY; private int endColor=Color.WHITE; private int thumbColor=Color.BLACK; private int thumbBorderColor=Color.WHITE; private int colorArray[]={startColor, middleColor, endColor}; private float x,y; private float mRadius; private float progress; private float maxCount = 100f; private float sLeft, sTop, sRight, sBottom; private float sWidth,sHeight; private LinearGradient linearGradient; private Paint paint = new Paint(); protected OnStateChangeListener onStateChangeListener; public VerticalColorSeekBar(Context context) { this(context, null); } public VerticalColorSeekBar(Context context, AttributeSet attrs) { super(context, attrs); } @Override protected synchronized void onMeasure(int widthMeasureSpec, int heightMeasureSpec) { super.onMeasure(widthMeasureSpec, heightMeasureSpec); setMeasuredDimension(getMeasuredWidth(), getMeasuredHeight()); } public void setColor(int startColor,int middleColor, int endColor,int thumbColor,int thumbBorderColor){ this.startColor= startColor; this.middleColor = middleColor; this.endColor= endColor; this.thumbColor= thumbColor; this.thumbBorderColor= thumbBorderColor; colorArray[0] = startColor; colorArray[1] = middleColor; colorArray[2] = endColor; } @Override protected void onDraw(Canvas canvas) { super.onDraw(canvas); int h = getMeasuredHeight(); int w = getMeasuredWidth(); mRadius = (float) w/2; sLeft = w * 0.25f; // 背景左边缘坐标 sRight = w * 0.75f;// 背景右边缘坐标 sTop = 0; sBottom = h; sWidth = sRight - sLeft; // 背景宽度 sHeight = sBottom - sTop; // 背景高度 x = (float) w/2;//圆心的x坐标 y = (float) (1-0.01*progress)*sHeight;//圆心y坐标 drawBackground(canvas); drawCircle(canvas); paint.reset(); } private void drawBackground(Canvas canvas){ RectF rectBlackBg = new RectF(sLeft, sTop, sRight, sBottom); linearGradient=new LinearGradient(sLeft,sTop,sWidth,sHeight,colorArray,null, Shader.TileMode.MIRROR); paint.setAntiAlias(true); paint.setStyle(Paint.Style.FILL); //设置渲染器 paint.setShader(linearGradient); canvas.drawRoundRect(rectBlackBg, sWidth/2, sWidth/2, paint); } private void drawCircle(Canvas canvas){ Paint thumbPaint = new Paint(); y = y < mRadius ? mRadius : y;//判断thumb边界 y = y > sHeight-mRadius ? sHeight-mRadius : y; thumbPaint.setAntiAlias(true); thumbPaint.setStyle(Paint.Style.FILL); thumbPaint.setColor(thumbColor); canvas.drawCircle(x, y, mRadius, thumbPaint); thumbPaint.setStyle(Paint.Style.STROKE); thumbPaint.setColor(thumbBorderColor); thumbPaint.setStrokeWidth(2); canvas.drawCircle(x, y, mRadius, thumbPaint); } @Override public boolean onTouchEvent(MotionEvent event) { this.y = event.getY(); progress= (sHeight-y)/sHeight*100; switch(event.getAction()) { case MotionEvent.ACTION_DOWN: break; case MotionEvent.ACTION_UP: if (onStateChangeListener!=null){ onStateChangeListener.onStopTrackingTouch(this, progress); } break; case MotionEvent.ACTION_MOVE: if (onStateChangeListener!=null){ onStateChangeListener.OnStateChangeListener(this, progress); } setProgress(progress); this.invalidate(); break; } return true; } public interface OnStateChangeListener{ void OnStateChangeListener(View view, float progress); void onStopTrackingTouch(View view, float progress); } public void setOnStateChangeListener(OnStateChangeListener onStateChangeListener){ this.onStateChangeListener=onStateChangeListener; } public void setProgress(float progress) { this.progress = progress; invalidate(); } }
结束
到这里就真的结束啦,就当记录一下吧,然后也希望帮到有需要的人。有更好的实现也可以告诉我哈~
以上就是本文的全部内容,希望对大家的学习有所帮助,也希望大家多多支持查字典教程网。