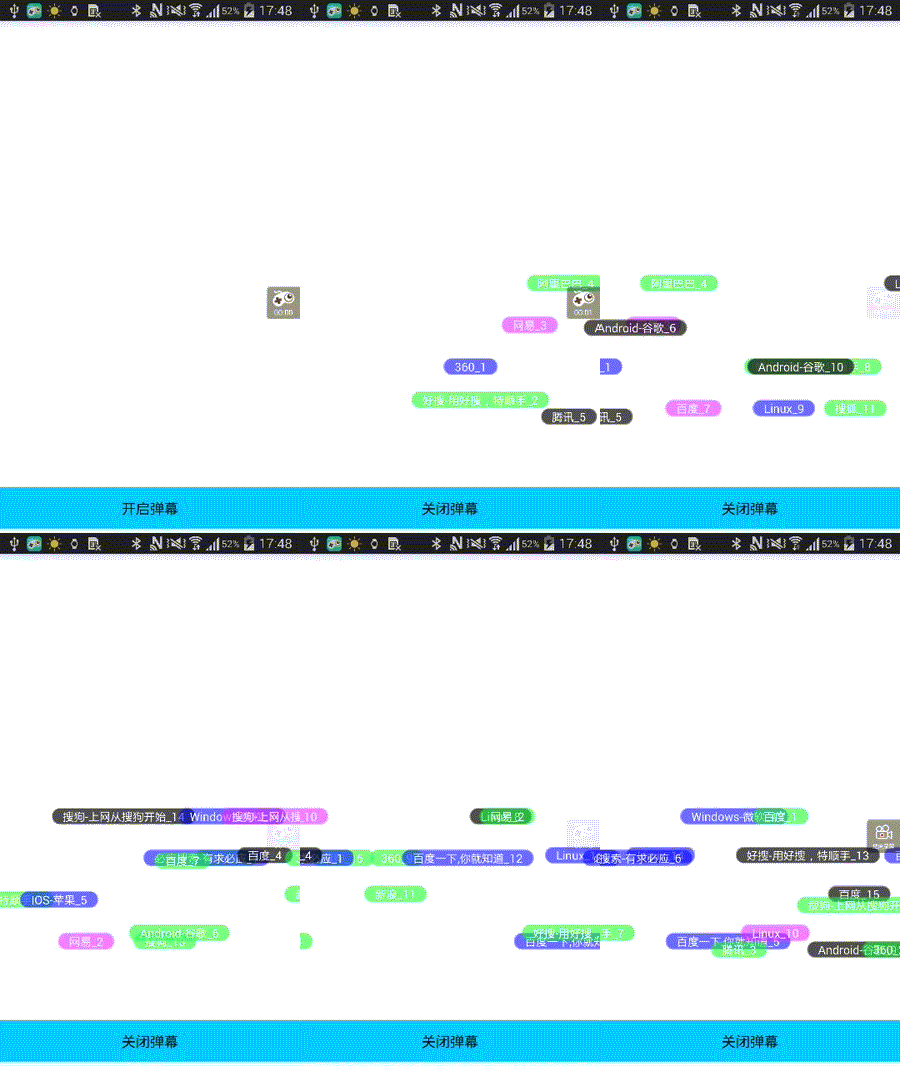
一、效果图
先来看看效果图吧~~

二、实现原理方案
1、自定义ViewGroup-XCDanmuView,继承RelativeLayout来实现,当然也可以继承其他三大布局类哈
2、初始化若干个TextView(弹幕的item View,这里以TextView 为例,当然也可以其他了~),然后通过addView添加到自定义View中
3、通过addView添加到XCDanmuView中,位置在坐标,为了实现 从屏幕外移动进来的效果
我们还需要修改添加进来TextView的位置,以从右向左移动方向来说,addView后必须将该TextView的位置设置到右边的屏幕外
这样我们采用的方法,是在onLayout()方法中对childView进行layout重新布局设置位置
4、随机冲左侧或右侧出来弹幕itemView,移动采用属性动画来实现平移,从屏幕的一端移动到另一端,当动画结束后,就将
该child从XCDanmuView中remove掉。并重新new 一个弹幕itemView ,并addView到XCDanmuView中,并开始动画移动
5、本自定义弹幕View支持从左到右和从右到左两个方向,支持自定义设置屏幕弹幕最多显示个数。
三、自定义弹幕效果XCDanmuView的具体实现
1、初始化需要用到的数据变量
private int mWidth; private int mScreenWidth; private List<View> mChildList; private boolean mIsWorking = false; private Context mContext; private int mMaxShowNum = 15; private int mRowNum = 4; private int[] mSpeeds = { 3000,4000,5000,6000 }; private int mDelayDuration = 500; private int[] mBgResIds = { R.drawable.bg_danmu0, R.drawable.bg_danmu1, R.drawable.bg_danmu2, R.drawable.bg_danmu3 }; private int[] mRowPos = { 150,140,160,150 }; private Random mRandom; private String[] mStrContents; public static enum XCDirection{ FROM_RIGHT_TO_LEFT, FORM_LEFT_TO_RIGHT } public enum XCAction{ SHOW,HIDE } private XCDirection mDirection = XCDirection.FROM_RIGHT_TO_LEFT; private void init() { mScreenWidth = getScreenWidth(); mChildList = new ArrayList<>(); mRandom = new Random(); }
2、初始化若干个弹幕item view
public void initDanmuItemViews(String[] strContents){ mStrContents = strContents; for(int i = 0; i < mMaxShowNum; i ++){ int index = mRandom.nextInt(100) % strContents.length; createDanmuView(i,strContents[index],false); } }
3、创建弹幕item view 并addView到XCDanmuView中
public void createDanmuView(int index,String content,boolean reset){ final TextView textView = new TextView(mContext); textView.setTextColor(Color.WHITE); int r = mRandom.nextInt(100) % mRowNum; textView.setBackgroundResource(mBgResIds[r]); textView.setText(content +"_"+ (index+1)); RelativeLayout.LayoutParams lp = new LayoutParams(LayoutParams.WRAP_CONTENT, RelativeLayout.LayoutParams.WRAP_CONTENT); int row = mRandom.nextInt(100) % mRowNum; while(row == lastRow){ row = mRandom.nextInt(100)% mRowNum; } int pos = mRandom.nextInt(100)% mRowNum; lp.topMargin = row * mRowPos[pos]; lastRow = row; textView.setLayoutParams(lp); textView.setPadding(40, 2, 40, 2); this.addView(textView); if(reset){ mChildList.set(index,textView); }else{ mChildList.add(index,textView); } textView.setClickable(true); textView.setOnClickListener(new OnClickListener() { @Override public void onClick(View view) { Toast toast = Toast.makeText(mContext, textView.getText(), Toast.LENGTH_SHORT); toast.setGravity(Gravity.TOP,0,50); toast.show(); } }); }
4、重新设置childView的初始位置到屏幕之外
@Override protected void onLayout(boolean changed, int l, int t, int r, int b) { super.onLayout(changed, l, t, r, b); int childCount = this.getChildCount(); for(int i=0;i<childCount;i++){ View view = getChildAt(i); RelativeLayout.LayoutParams lp = (LayoutParams) view.getLayoutParams(); if(lp.leftMargin <= 0){ if(mDirection == XCDirection.FORM_LEFT_TO_RIGHT){ view.layout(-view.getMeasuredWidth(), lp.topMargin, 0,lp.topMargin + view.getMeasuredHeight()); }else{ view.layout(mScreenWidth,lp.topMargin,mScreenWidth+view.getMeasuredWidth(), lp.topMargin+view.getMeasuredHeight()); } }else{ continue; } } }
5、弹幕item view的移动效果
private Handler mHandler = new Handler() { @Override public void handleMessage(final Message msg) { super.handleMessage(msg); final int pos = msg.what; ViewPropertyAnimator animator; if(mDirection == XCDirection.FROM_RIGHT_TO_LEFT){ animator = mChildList.get(msg.what).animate() .translationXBy(-(mScreenWidth + mChildList.get(msg.what).getWidth())); }else{ animator = mChildList.get(msg.what).animate() .translationXBy(mScreenWidth + mChildList.get(msg.what).getWidth()); } Random random = new Random(System.currentTimeMillis()); int index = random.nextInt(100) % mSpeeds.length; animator.setDuration(mSpeeds[index]); animator.setInterpolator(new LinearInterpolator()); animator.setListener(new Animator.AnimatorListener() { @Override public void onAnimationStart(Animator animator) { } @Override public void onAnimationEnd(Animator animator) { XCDanmuView.this.removeView(mChildList.get(pos)); int index = mRandom.nextInt(100) % mStrContents.length; createDanmuView(pos, mStrContents[index], true); mHandler.sendEmptyMessageDelayed(pos, mDelayDuration); Log.v("czm", "size=" + mChildList.size()); } @Override public void onAnimationCancel(Animator animator) { } @Override public void onAnimationRepeat(Animator animator) { } }); animator.start(); } };
6、开启弹幕效果和关闭弹幕效果以及对于的动画效果
boolean isFirst = true; public void start(){ switchAnimation(XCAction.SHOW); if(isFirst){ for(int i =0;i< mChildList.size();i++){ mHandler.sendEmptyMessageDelayed(i,i * mDelayDuration); } isFirst = false; } mIsWorking = true; } public void hide(){ switchAnimation(XCAction.HIDE); mIsWorking =false; } public void stop(){ this.setVisibility(View.GONE); for(int i =0;i< mChildList.size();i++){ mChildList.get(i).clearAnimation(); mHandler.removeMessages(i); } mIsWorking =false; } private void switchAnimation(final XCAction action){ AlphaAnimation animation; if(action == XCAction.HIDE){ animation = new AlphaAnimation(1.0f,0.0f); animation.setDuration(400); }else{ animation = new AlphaAnimation(0.0f,1.0f); animation.setDuration(1000); } XCDanmuView.this.startAnimation(animation); animation.setAnimationListener(new Animation.AnimationListener() { @Override public void onAnimationStart(Animation animation) { } @Override public void onAnimationEnd(Animation animation) { if(action == XCAction.HIDE){ XCDanmuView.this.setVisibility(View.GONE); }else{ XCDanmuView.this.setVisibility(View.VISIBLE); } } @Override public void onAnimationRepeat(Animation animation) { } }); }
四、如何使用该自定义侧滑View控件
使用该自定义View非常简单,控件默认效果从右向左,如果需要修改方向为从左到右,只需设置下方向即可
public class MainActivity extends Activity { private XCDanmuView mDanmuView; private List<View> mViewList; private String[] mStrItems = { "搜狗","百度", "腾讯","360", "阿里巴巴","搜狐", "网易","新浪", "搜狗-上网从搜狗开始","百度一下,你就知道", "必应搜索-有求必应","好搜-用好搜,特顺手", "Android-谷歌","IOS-苹果", "Windows-微软","Linux" }; @Override protected void onCreate(Bundle savedInstanceState) { super.onCreate(savedInstanceState); setContentView(R.layout.activity_main); initDanmuView(); initListener(); } private void initListener() { findViewById(R.id.btn).setOnClickListener(new View.OnClickListener() { @Override public void onClick(View view) { if (mDanmuView.isWorking()) { mDanmuView.hide(); ((Button) view).setText("开启弹幕"); } else { mDanmuView.start(); ((Button) view).setText("关闭弹幕"); } } }); } private void initDanmuView() { mDanmuView = (XCDanmuView)findViewById(R.id.danmu); mDanmuView.initDanmuItemViews(mStrItems); } }
五、总结
以上就是在Android中实现自定义弹幕效果的全部内容个,希望本文的内容对大家开发Android的时候能有所帮助。如果有疑问可以留言交流。


