

Android Gallery和GridView组件:
Gallery 画廊
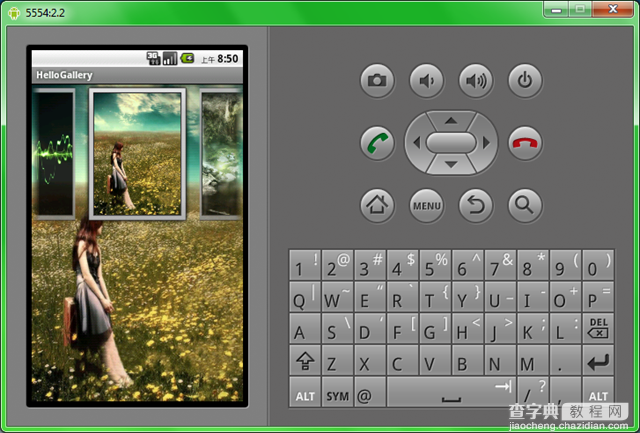
Gallery是一个内部元素可以水平滚动,并且可以把当前选择的子元素定位在它中心的布局组件。
我们还是直接看看例子的运行效果。
下面上代码,相关解释都放在代码里了。
1、建立一个新项目 HelloGallery
2、拷贝wallpaper_0.jpg…wallpaper_9.jpg 10个图片文件到res/drawable目录
3、res/layout/main.xml文件的内容如下:
<"1.0" encoding="utf-8"?> <framelayout android:layout_height="fill_parent" android:layout_width="fill_parent" xmlns:android="http://schemas.android.com/apk/res/android" android:id="@+id/FrameLayout01"> <imageview android:layout_height="fill_parent" android:layout_width="fill_parent" android:id="@+id/ImageView01" android:src="@drawable/wallpaper_0"> </imageview> <gallery android:layout_height="wrap_content" android:layout_width="fill_parent" xmlns:android="http://schemas.android.com/apk/res/android" android:id="@+id/Gallery01" android:spacing="5dp"> </gallery> </framelayout>
其中我们使用FrameLayout来实现叠加效果,使用ImageView来显示大图,Gallery来展示画廊,android:spacing="5dp" 属性则是用来设置元素之间的间隔。
4、在res/values/目录中新建一个attrs.xml内容如下:
<"1.0" encoding="UTF-8"?> <resources> <declare -styleable="" name="HelloGallery"> <attr name="android:galleryItemBackground"> </attr></declare> </resources>
5、在MainHelloGallery.java中的内容如下:
package android.basic.lesson13; import android.app.Activity; import android.content.Context; import android.content.res.TypedArray; import android.os.Bundle; import android.view.View; import android.view.ViewGroup; import android.widget.AdapterView; import android.widget.AdapterView.OnItemClickListener; import android.widget.BaseAdapter; import android.widget.Gallery; import android.widget.ImageView; import android.widget.Toast; public class MainHelloGallery extends Activity { /** Called when the activity is first created. */ @Override public void onCreate(Bundle savedInstanceState) { super.onCreate(savedInstanceState); setContentView(R.layout.main); //定义UI组件 final ImageView iv= (ImageView)findViewById(R.id.ImageView01); Gallery g = (Gallery) findViewById(R.id.Gallery01); //设置图片匹配器 g.setAdapter(new ImageAdapter(this)); //设置AdapterView点击监听器,Gallery是AdapterView的子类 g.setOnItemClickListener(new OnItemClickListener() { @Override public void onItemClick(AdapterView<?> parent, View view, int position, long id) { //显示点击的是第几张图片 Toast.makeText(MainHelloGallery.this, "" + position, Toast.LENGTH_LONG).show(); //设置背景部分的ImageView显示当前Item的图片 iv.setImageResource(((ImageView)view).getId()); } }); } //定义继承BaseAdapter的匹配器 public class ImageAdapter extends BaseAdapter { //Item的修饰背景 int mGalleryItemBackground; //上下文对象 private Context mContext; //图片数组 private Integer[] mImageIds = { R.drawable.wallpaper_0, R.drawable.wallpaper_1, R.drawable.wallpaper_2, R.drawable.wallpaper_3, R.drawable.wallpaper_4, R.drawable.wallpaper_5, R.drawable.wallpaper_6, R.drawable.wallpaper_7, R.drawable.wallpaper_8, R.drawable.wallpaper_9 }; //构造方法 public ImageAdapter(Context c){ mContext = c; //读取styleable资源 TypedArray a = obtainStyledAttributes(R.styleable.HelloGallery); mGalleryItemBackground = a.getResourceId( R.styleable.HelloGallery_android_galleryItemBackground, 0); a.recycle(); } //返回项目数量 @Override public int getCount() { return mImageIds.length; } //返回项目 @Override public Object getItem(int position) { return position; } //返回项目Id @Override public long getItemId(int position) { return position; } //返回视图 @Override public View getView(int position, View convertView, ViewGroup parent) { ImageView iv = new ImageView(mContext); iv.setImageResource(mImageIds[position]); //给生成的ImageView设置Id,不设置的话Id都是-1 iv.setId(mImageIds[position]); iv.setLayoutParams(new Gallery.LayoutParams(120, 160)); iv.setScaleType(ImageView.ScaleType.FIT_XY); iv.setBackgroundResource(mGalleryItemBackground); return iv; } } }
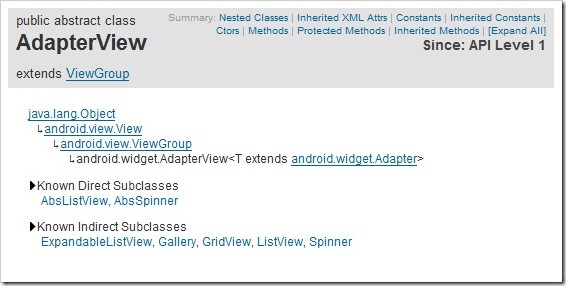
我们点击某一张图片,会把该子元素的图片显示在放在后面一层的ImageView组件中。有兴趣的同学可以了解一下AdapterView的继承关系:
以上就是对Android Gallery 和 GridView 组件的介绍,后续继续对相关知识补充,谢谢大家对本站的支持!