

shape和selector是Android UI设计中经常用到的,比如我们要自定义一个圆角Button,点击Button有些效果的变化,就要用到shape和selector。可以这样说,shape和selector在美化控件中的作用是至关重要的。
1.Shape
简介
作用:XML中定义的几何形状
位置:res/drawable/文件的名称.xml
使用的方法:
Java代码中:R.drawable.文件的名称
XML中:android:background="@drawable/文件的名称"
属性:
<shape> android:shape=["rectangle" | "oval" | "line" | "ring"]
其中rectagle矩形,oval椭圆,line水平直线,ring环形
<shape>中子节点的常用属性:
<gradient> 渐变
android:startColor 起始颜色
android:endColor 结束颜色
android:angle 渐变角度,0从上到下,90表示从左到右,数值为45的整数倍默认为0;
android:type 渐变的样式 liner线性渐变 radial环形渐变 sweep
<solid > 填充
android:color 填充的颜色
<stroke > 描边
android:width 描边的宽度
android:color 描边的颜色
android:dashWidth 表示'-'横线的宽度
android:dashGap 表示'-'横线之间的距离
<corners > 圆角
android:radius 圆角的半径 值越大角越圆
android:topRightRadius 右上圆角半径
android:bottomLeftRadius 右下圆角角半径
android:topLeftRadius 左上圆角半径
android:bottomRightRadius 左下圆角半径
2.Selector
简介
位置:res/drawable/文件的名称.xml
使用的方法:
Java代码中:R.drawable.文件的名称
XML中:android:background="@drawable/文件的名称"
<"1.0" encoding="utf-8" ?> <selector xmlns:android="http://schemas.android.com/apk/res/android"> <> <item android:drawable="@drawable/pic1" /> <> <item android:state_window_focused="false" android:drawable="@drawable/pic_blue" /> <> <item android:state_focused="true" android:state_pressed="true" android:drawable= "@drawable/pic_red" /> <> <item android:state_focused="false" android:state_pressed="true" android:drawable="@drawable/pic_pink" /> <> <item android:state_selected="true" android:drawable="@drawable/pic_orange" /> <> <item android:state_focused="true" android:drawable="@drawable/pic_green" /> </selector>
第一个例子:圆角的Button
http://liangruijun.blog.51cto.com/3061169/630051
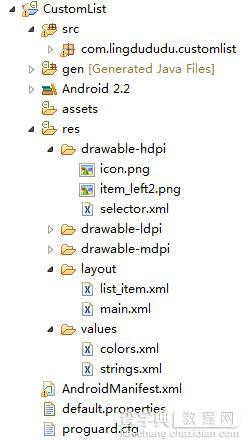
第二个例子:shape+selector综合使用的例子 漂亮的ListView
先看看这个例子的结构:
selector.xml
<"1.0" encoding="utf-8"?> <selector xmlns:android="http://schemas.android.com/apk/res/android"> <item android:state_selected="true"> <shape> <gradient android:angle="270" android:endColor="#99BD4C" android:startColor="#A5D245" /> <size android:height="60dp" android:width="320dp" /> <corners android:radius="8dp" /> </shape> </item> <item android:state_pressed="true"> <shape> <gradient android:angle="270" android:endColor="#99BD4C" android:startColor="#A5D245"/> <size android:height="60dp" android:width="320dp" /> <corners android:radius="8dp" /> </shape> </item> <item> <shape> <gradient android:angle="270" android:endColor="#A8C3B0" android:startColor="#C6CFCE" /> <size android:height="60dp" android:width="320dp" /> <corners android:radius="8dp" /> </shape> </item> </selector>
list_item.xml
<"1.0" encoding="utf-8"?> <LinearLayout xmlns:android="http://schemas.android.com/apk/res/android" android:orientation="horizontal" android:layout_width="fill_parent" android:layout_height="wrap_content" android:background="@drawable/selector" > <ImageView android:id="@+id/img" android:layout_width="wrap_content" android:layout_height="wrap_content" android:layout_gravity="center_vertical" android:layout_marginLeft="20dp" /> <TextView android:text="data" android:id="@+id/title" android:layout_width="fill_parent" android:layout_height="wrap_content" android:gravity="center_vertical" android:layout_marginLeft="20dp" android:layout_marginTop="20dp" android:textSize="14sp" android:textStyle="bold" android:textColor="@color/black" > </TextView> </LinearLayout>
main.xml
<"1.0" encoding="utf-8"?> <LinearLayout xmlns:android="http://schemas.android.com/apk/res/android" android:orientation="vertical" android:layout_width="fill_parent" android:layout_height="wrap_content" android:background="#253853" > <ListView android:id="@+id/list" android:layout_width="match_parent" android:layout_height="match_parent" android:cacheColorHint="#00000000" android:divider="#2A4562" android:dividerHeight="3px" android:listSelector="#264365" android:drawSelectorOnTop="false" > </ListView> </LinearLayout>
colors.xml
<"1.0" encoding="utf-8"?> <resources> <color name="white">#FFFFFFFF</color> <color name="transparency">#00000000</color> <color name="title_bg">#1C86EE</color> <color name="end_color">#A0cfef83</color> <color name="black">#464646</color> </resources>
MainActivity.xml
package com.lingdududu.customlist; import java.util.ArrayList; import java.util.HashMap; import xb.customlist.R; import android.R.array; import android.app.Activity; import android.os.Bundle; import android.widget.ArrayAdapter; import android.widget.ListView; import android.widget.SimpleAdapter; public class MainActivity extends Activity { ListView list; String data[] = new String[]{ "China","UK","USA","Japan","German","Canada","ET","Narotu" }; /** Called when the activity is first created. */ @Override public void onCreate(Bundle savedInstanceState) { super.onCreate(savedInstanceState); setContentView(R.layout.main); list =(ListView) findViewById(R.id.list); SimpleAdapter adapter = new SimpleAdapter(this, getData(), R.layout.list_item, new String[]{"title","img"}, new int[]{R.id.title,R.id.img}); list.setAdapter(adapter); } private ArrayList<HashMap<String, Object>> getData() { ArrayList<HashMap<String, Object>> dlist = new ArrayList<HashMap<String,Object>>(); for(int i =0;i<data.length;i++){ HashMap<String, Object>map = new HashMap<String, Object>(); map.put("title", data[i]); map.put("img", R.drawable.item_left2); dlist.add(map); } return dlist; } }
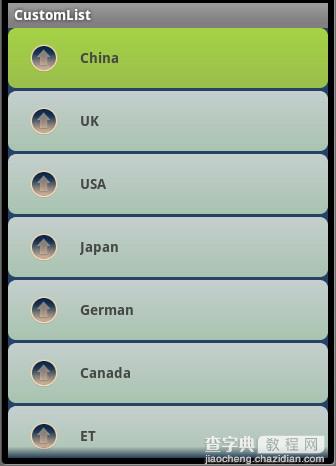
效果图:
以上所述是小编给大家分享的Android开发教程之shape和selector的结合使用的相关内容,希望对大家有所帮助。