今天学习了Spinner组件的使用,非常好用的一款组件,相当于从下拉列表中选择项目,今天收获颇多,下面给大家演示一下Spinner的使用(分别使用ArrayAdapter和自定义Adapter实现),具体内容如下。
(一):使用ArrayAdapter进行适配数据:
①:首先定义一个布局文件:
<span><"1.0" encoding="utf-8"?> <LinearLayout xmlns:android="http://schemas.android.com/apk/res/android" android:layout_width="fill_parent" android:layout_height="fill_parent" android:orientation="vertical" > <Spinner android:id="@+id/spinner1" android:layout_width="match_parent" android:layout_height="wrap_content" /> </LinearLayout></span>
【注意:】上面的Spinner有两个属性1:prompt是初始的时候,Spinner显示的数据,是一个引用类型 2:entries是直接在xml布局文件中绑定数据源(可以不设置,即可以在Activity中动态绑定)
②:建立数据源,使用数组,这些数据将会在Spinner下来列表中进行显示:
<span><"1.0" encoding="utf-8"?> <resources> <string-array name="spinnername"> <item>北京</item> <item>上海 </item> <item>广州</item> <item>深圳</item> </string-array> </resources></span>
③:接着在Activity中加入如下的代码(使用了系统定义的下拉列表的布局文件,当然也可以自定义)
// 初始化控件 mSpinner = (Spinner) findViewById(R.id.spinner1); // 建立数据源 String[] mItems = getResources().getStringArray(R.array.spinnername); // 建立Adapter并且绑定数据源 ArrayAdapter<String> _Adapter=new ArrayAdapter<String>(this,android.R.layout.simple_spinner_item, mItems); //绑定 Adapter到控件 mSpinner.setAdapter(_Adapter);
以上代码初步完成,看下运行效果:
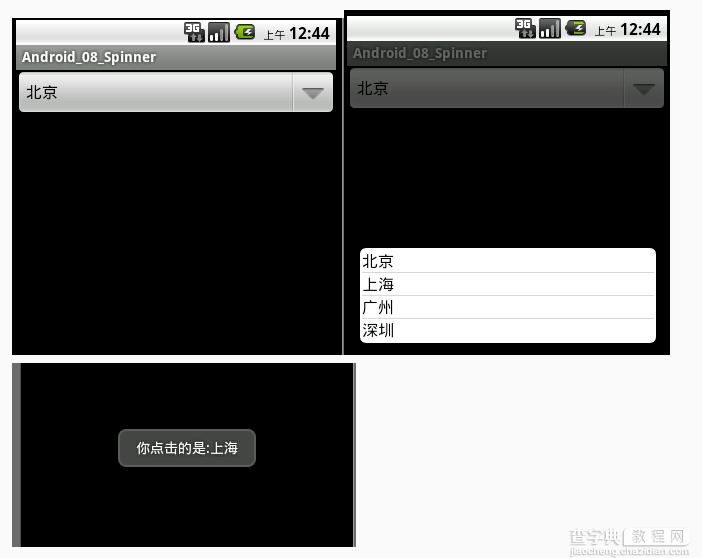
下面是关于Spinner的点击事件(效果图如上图):
mSpinner.setOnItemSelectedListener(new OnItemSelectedListener() { @Override public void onItemSelected(AdapterView<?> parent, View view, int position, long id) { String str=parent.getItemAtPosition(position).toString(); Toast.makeText(SpinnerActivity.this, "你点击的是:"+str, 2000).show(); } @Override public void onNothingSelected(AdapterView<?> parent) { // TODO Auto-generated method stub } });
(二)使用自定义的Adapter(重点)
①:定义每一个Item的布局文件
<"1.0" encoding="utf-8"?> <LinearLayout xmlns:android="http://schemas.android.com/apk/res/android" android:layout_width="match_parent" android:layout_height="match_parent" android:orientation="horizontal" > <TextView android:id="@+id/textView1" android:layout_width="wrap_content" android:layout_height="wrap_content" android:drawableLeft="@drawable/ic_launcher" android:paddingRight="8dip" android:paddingTop="8dip" android:text="TextView" android:textSize="25sp" /> <TextView android:id="@+id/textView2" android:layout_width="wrap_content" android:layout_height="wrap_content" android:paddingLeft="8dip" android:paddingTop="8dip" android:text="TextView" android:textSize="25sp" /> </LinearLayout>
②:建立Person类:
package com.jiangqq.csdn; public class Person { private String personName; private String personAddress; public Person(String personName, String personAddress) { super(); this.personName = personName; this.personAddress = personAddress; } public String getPersonName() { return personName; } public void setPersonName(String personName) { this.personName = personName; } public String getPersonAddress() { return personAddress; } public void setPersonAddress(String personAddress) { this.personAddress = personAddress; } }
③:创建MyAdapter继承与BaseAdapter,进行适配:
package com.jiangqq.csdn; import java.util.List; import android.content.Context; import android.view.LayoutInflater; import android.view.View; import android.view.ViewGroup; import android.widget.BaseAdapter; import android.widget.TextView; /** * 自定义适配器类 * @author jiangqq <a href=http://blog.csdn.net/jiangqq781931404></a> * */ public class MyAdapter extends BaseAdapter { private List<Person> mList; private Context mContext; public MyAdapter(Context pContext, List<Person> pList) { this.mContext = pContext; this.mList = pList; } @Override public int getCount() { return mList.size(); } @Override public Object getItem(int position) { return mList.get(position); } @Override public long getItemId(int position) { return position; } /** * 下面是重要代码 */ @Override public View getView(int position, View convertView, ViewGroup parent) { LayoutInflater _LayoutInflater=LayoutInflater.from(mContext); convertView=_LayoutInflater.inflate(R.layout.item, null); if(convertView!=null) { TextView _TextView1=(TextView)convertView.findViewById(R.id.textView1); TextView _TextView2=(TextView)convertView.findViewById(R.id.textView2); _TextView1.setText(mList.get(position).getPersonName()); _TextView2.setText(mList.get(position).getPersonAddress()); } return convertView; } }
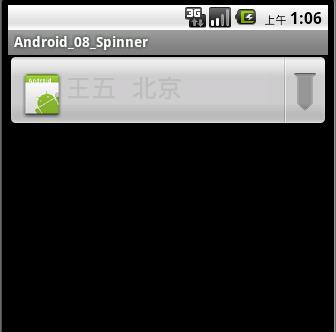
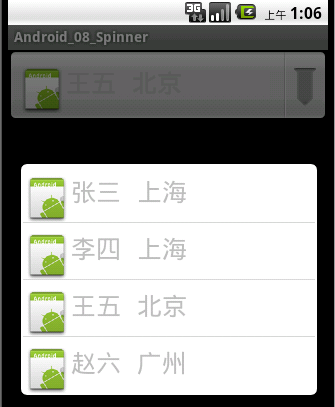
④:在Activity中加入如下代码:
// 初始化控件 mSpinner = (Spinner) findViewById(R.id.spinner1); // 建立数据源 List<Person> persons=new ArrayList<Person>(); persons.add(new Person("张三", "上海 ")); persons.add(new Person("李四", "上海 ")); persons.add(new Person("王五", "北京" )); persons.add(new Person("赵六", "广州 ")); // 建立Adapter绑定数据源 MyAdapter _MyAdapter=new MyAdapter(this, persons); //绑定Adapter mSpinner.setAdapter(_MyAdapter);
运行效果如下截图: