

css3的动画功能有以下三种:
1、transition(过度属性)
2、animation(动画属性)
3、transform(2D/3D转换属性)
下面逐一进行介绍我的理解:
1、transition:<过渡属性名称> <过渡时间> <过渡模式>
如-webkit-transition:color 1s;
等同于:
-webkit-transition-property:color;
-webkit-transition-duration:1s;
多个属性的过渡效果可以这样写:
方法1:-webkit-transition:<属性1> <时间1> ,<属性2> <时间2> ,。。。
方法2:
-webkit-transition:<属性1> <时间1>;
-webkit-transition:<属性2> <时间2>;
transition-timing-function属性值有5个:
ease:缓慢开始,缓慢结束
liner:匀速
ease-in:缓慢开始
ease-out:缓慢结束
ease-in-out:缓慢开始,缓慢结束(和ease稍有区别)
实例:
transition过渡效果
XML/HTML Code复制内容到剪贴板 <!DOCTYPEhtml> <htmllang="en"> <head> <metacharset="UTF-8"> <title>transition过渡效果</title> <style> *{ margin:0px; padding:0px; } #box{ width:200px; height:200px; background-color:chocolate; position:relative; left:0px; top:0px; transition:top5sease,left5sease; -moz-transition:top5sease,left5sease;/*Firefox4*/ -webkit-transition:top5sease,left5sease;/*SafariandChrome*/ -o-transition:top5sease,left5sease;/*Opera*/ } .btn{ width:512px; margin:0auto; border:2pxsolid#e3e3e3; border-radius:5px; padding:10px; } .btnbutton{ width:80px; height:40px; text-align:center; line-height:40px; margin-right:20px; } button:last-child{ margin-right:0px; } </style> <script> window.onload=function(){ vare1=document.getElementById("e1"); vare2=document.getElementById("e2"); vare3=document.getElementById("e3"); vare4=document.getElementById("e4"); vare5=document.getElementById("e5"); varbox=document.getElementById("box"); e1.onclick=function(){ box.style.left=1000+"px"; box.style.top=100+"px"; box.style.transitionTimingFunction="ease"; }; e2.onclick=function(){ box.style.right=0+"px"; box.style.top=0+"px"; box.style.transitionTimingFunction="liner"; }; e3.onclick=function(){ box.style.right=1000+"px"; box.style.top=100+"px"; box.style.transitionTimingFunction="ease-in"; }; e4.onclick=function(){ box.style.left=0+"px"; box.style.top=0+"px"; box.style.transitionTimingFunction="ease-out"; }; e5.onclick=function(){ box.style.left=1000+"px"; box.style.top=100+"px"; box.style.transitionTimingFunction="ease-in-out"; }; } </script> </head> <body> <divid="box"></div> <br> <br> <br> <br> <br> <br> <hr> <br> <br> <br> <divclass="btn"> <buttonid="e1">ease</button> <buttonid="e2">liner</button> <buttonid="e3">ease-in</button> <buttonid="e4">ease-out</button> <buttonid="e5">ease-in-out</button> </div> </body> </html>
2、动画属性animation
animation: name duration timing-function delay iteration-count direction;
|
值 |
描述 |
|
animation-name |
规定需要绑定到选择器的 keyframe 名称。。 |
|
animation-duration |
规定完成动画所花费的时间,以秒或毫秒计。 |
|
animation-timing-function |
规定动画的速度曲线。 |
|
animation-delay |
规定在动画开始之前的延迟。 |
|
animation-iteration-count |
规定动画应该播放的次数。 |
|
animation-direction |
规定是否应该轮流反向播放动画。 |
注释:Internet Explorer 9 以及更早的版本不支持 animation 属性。
@keyframes animationname {keyframes-selector {css-styles;}}
|
值 |
描述 |
|
animationname |
必需。定义动画的名称。 |
|
keyframes-selector |
必需。动画时长的百分比。 合法的值: 0-100% from(与 0% 相同) to(与 100% 相同) |
|
css-styles |
必需。一个或多个合法的 CSS 样式属性。 |
以百分比来规定改变发生的时间,或者通过关键词 "from" 和 "to",等价于 0% 和 100%。
0% 是动画的开始时间,100% 动画的结束时间。
例如:
CSS Code复制内容到剪贴板 animation:mymove5sinfinite; @keyframesmymove{ from{top:0px;} to{top:200px;} }
还可以这么写:
CSS Code复制内容到剪贴板 @keyframesmymove{ 0%{top:0px;} 25%{top:200px;} 50%{top:100px;} 75%{top:200px;} 100%{top:0px;} }
案例:
css3的animation效果
XML/HTML Code复制内容到剪贴板 <!DOCTYPEhtml> <html> <head> <style> div { width:100px; height:100px; background:red; position:relative; animation:mymove5sinfinite; -moz-animation:mymove5sinfinite;/*Firefox*/ -webkit-animation:mymove5sinfinite;/*SafariandChrome*/ -o-animation:mymove5sinfinite;/*Opera*/ } @keyframesmymove { from{top:0px;} to{top:200px;} } @-moz-keyframesmymove/*Firefox*/ { from{top:0px;} to{top:200px;} } @-webkit-keyframesmymove/*SafariandChrome*/ { from{top:0px;} to{top:200px;} } @-o-keyframesmymove/*Opera*/ { from{top:0px;} to{top:200px;} } </style> </head> <body> <p><b>注释:</b>本例在InternetExplorer中无效。</p> <div></div> </body> </html>
3、设置3D场景(即transform)
-webkit-perspective:800;(单位为像素)--即三维物体距离屏幕的距离。
-webkit-perspective-origin:50% 50%;(这个属性代表了人眼观察的视野。50% 50%为X轴、Y轴相应的位置,即屏幕的正中央。)
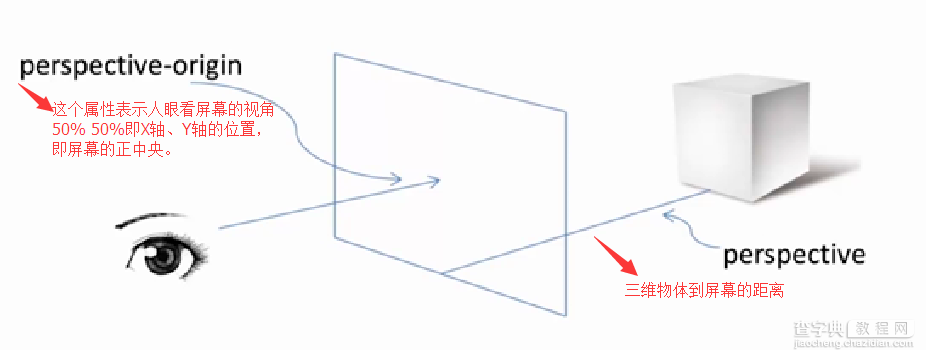
使用transform属性调整元素:-webkit-transform-style:-webkit-perserve-3d;(这个属性是告诉浏览器我们是在一个三维空间中对元素进行操作)
(1)、translate(移动距离)
translateX(x px)
translateY(y px)
translateZ(z px)
(2)、rotate(旋转角度)
rotateX(x deg)
rotateY(y deg)
rotateZ(z deg)
transform:rotate(45deg)
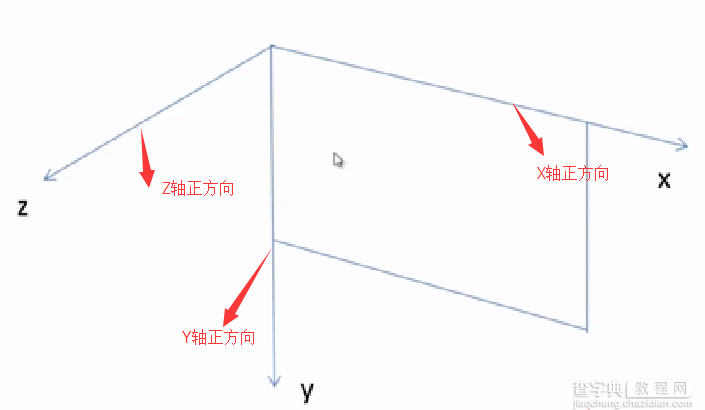
rotateX:向屏幕上边沿向内旋转为正方向。
rotateY:向屏幕竖直向下为正方向。
rotateZ:向屏幕外为正方向。
一个div块,右边沿向屏幕内旋转45deg,即应设置为:Transform:rotateY(45deg)。
实例:
transform3D转换效果
XML/HTML Code复制内容到剪贴板 <!DOCTYPEhtml> <htmllang="en"> <head> <metacharset="UTF-8"> <title>transform3D转换效果</title> <style> *{ margin:0px; padding:0px; } #box{ width:200px; height:200px; background-color:chocolate; position:relative; left:0px; top:0px; perspective:800px; perspective-origin:50%50%; transform-style:preserve-3d; transform-origin:0%100%;//以Y轴为旋转中心 } p{ margin:20px520px; } .btn{ width:300px; margin:0auto; border:2pxsolid#e3e3e3; border-radius:5px; padding:10px; } .btnbutton{ width:80px; height:40px; text-align:center; line-height:40px; margin-right:20px; } button:last-child{ margin-right:0px; } </style> <script> window.onload=function(){ vartx=document.getElementById("tx"); varty=document.getElementById("ty"); vartz=document.getElementById("tz"); varrx=document.getElementById("rx"); varry=document.getElementById("ry"); varrz=document.getElementById("rz"); varbox=document.getElementById("box"); tx.onclick=function(){ box.style.transform="translateX(500px)"; }; ty.onclick=function(){ box.style.transform="translateY(400px)" }; rx.onclick=function(){ box.style.transform="rotateX(30deg)" }; ry.onclick=function(){ box.style.transform="rotateY(30deg)" }; rz.onclick=function(){ box.style.transform="rotateZ(30deg)" }; } </script> </head> <body> <divid="box"></div> <br> <br> <br> <br> <br> <br> <hr> <br> <br> <br> <p>translate(移动距离)</p> <divclass="btn"> <buttonid="tx">translateX</button> <buttonid="ty">translateY</button> </div> <p>rotate(旋转角度)</p> <divclass="btn"> <buttonid="rx">rotateX</button> <buttonid="ry">rotateY</button> <buttonid="rz">rotateZ</button> </div> </body> </html>
使用transform-origin属性调整旋转中心。默认旋转中心点为div盒子的正中心。
这个旋转中心是可以改变的:
X轴:left、center、right.
Y轴:top、center、bottom.
Z轴:length px(一个长度值)。
以上这篇css3动画效果小结(推荐)就是小编分享给大家的全部内容了,希望能给大家一个参考,也希望大家多多支持查字典教程网。
原文地址:http://www.cnblogs.com/gaotenglong/archive/2016/07/24/5700997.html