

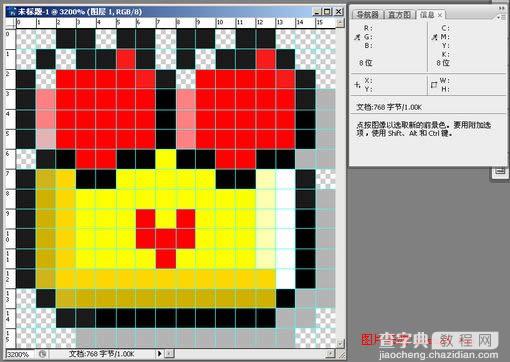
以图片中的色青蛙为例子。
16X16的像素图,所以使用了如下的命名方法:
r N c N - NN = r[0-15]c[0-15]
(r = rol, c-col, N为自然数:0-15 )
1.命名的规则抄袭了XXX栅格化的那篇文章。
r0c1 即表示:0 横列 1 纵列,也是top跟left的值
NN表示:W H (宽和高)
(觉得最好是使用连字符这样对于10以上的数字,可以直接看出来宽和高的数值,我的这个就不优化了 :P)
2.使用相对定位给个基点,然后使用绝对定位的top和left来控制数值,直接对应rNcN,方便快捷的对应起来。比如:
.r0c8-21{
top:0; /* 对应row的第0行 */
left:8px; /* 对应col的第8列 */
width:2px; /* 对应width的2px */
height:1px;/* 对应height的1px */
background:#000;
}
.r2c0-14{
top:2px;
left:0px;
width:1px;
height:4px;
background:#000;
}
3.使用PS的信息结合坐标方便查找r和c的值。
各位有兴趣,可以做其他的CSS像素青蛙。
效果:
<!DOCTYPE html PUBLIC "-//W3C//DTD XHTML 1.0 Transitional//EN" "http://www.w3.org/TR/xhtml1/DTD/xhtml1-transitional.dtd"> <html xmlns="http://www.w3.org/1999/xhtml"> <head> <meta http-equiv="Content-Type" content="text/html; charset=gb2312" /> <title>像素图色青蛙</title> <style type="text/css"> /* For: pixe img Author: San Date: 2009-05-13 */ body{ background:#fff; } .pixe{ position:relative; width:16px; height:16px; } .pixe em{ position:absolute; font-size:1px; line-height:1px; } /* row 0 */ .r0c2-21{ top:0; left:2px; width:2px; height:1px; background:#000; } .r0c5-21{ top:0; left:5px; width:2px; height:1px; background:#000; } .r0c8-21{ top:0; left:8px; width:2px; height:1px; background:#000; } .r0c11-21{ top:0; left:11px; width:2px; height:1px; background:#000; } /* row 1 */ .r1c1-11{ top:1px; left:1px; height:1px; width:1px; background:#000; } .r1c3-21{ top:1px; left:3px; width:2px; height:1px; background:#000; } .r1c5-11{ top:1px; left:5px; width:1px; height:1px; background:#f00; } .r1c6-11{ top:1px; left:6px; width:1px; height:1px; background:#000; } .r1c8-11{ top:1px; left:8px; width:1px; height:1px; background:#000; } .r1c10-21{ top:1px; left:10px; width:2px; height:1px; background:#000; } .r1c12-11{ top:1px; left:12px; width:1px; height:1px; background:#f00; } .r1c13-11{ top:1px; left:13px; width:1px; height:1px; background:#000; } /* row 2*/ .r2c0-14{ top:2px; left:0px; width:1px; height:4px; background:#000; } .r2c2-54{ top:2px; left:2px; width:5px; height:4px; background:#f00; } .r2c7-14{ top:2px; left:7px; width:1px; height:4px; background:#000; } .r2c9-54{ top:2px; left:9px; width:5px; height:4px; background:#f00; } .r2c14-14{ top:2px; left:14px; width:1px; height:4px; background:#000; } /* row 3 */ .r3c1-12{ top:3px; left:1px; width:1px; height:2px; background:#ff8080; } .r3c8-12{ top:3px; left:8px; width:1px; height:2px; background:#ff8080; } .r3c15-14{ top:3px; left:15px; width:1px; height:4px; background:#b4b4b4; } /* row 5 */ .r5c1-11{ top:5px; left:1px; width:1px; height:1px; background:#e4b4b4; } /* row 6 */ .r6c1-21{ top:6px; left:1px; width:2px; height:1px; background:#000; } .r6c3-21{ top:6px; left:3px; width:2px; height:1px; background:#f00; } .r6c5-21{ top:6px; left:5px; width:2px; height:1px; background:#000; } .r6c7-11{ top:6px; left:7px; width:1px; height:1px; background:#ff0; } .r6c8-21{ top:6px; left:8px; width:2px; height:1px; background:#000; } .r6c10-21{ top:6px; left:10px; width:2px; height:1px; background:#f00; } .r6c12-21{ top:6px; left:12px; width:2px; height:1px; background:#000; } .r6c14-11{ top:6px; left:14px; width:1px; height:1px; background:#b4b4b4; } /* row 7 */ .r7c0-16{ top:7px; left:0px; width:1px; height:6px; background:#000; } .r7c1-16{ top:7px; left:1px; width:1px; height:6px; background:#d0b000; } .r7c2-16{ top:7px; left:2px; width:1px; height:6px; background:#ffd700; } .r7c3-21{ top:7px; left:3px; width:2px; height:1px; background:#000; } .r7c5-51{ top:7px; left:5px; width:5px; height:1px; background:#ff0; } .r7c10-21{ top:7px; left:10px; width:2px; height:1px; background:#000; } .r7c12-15{ top:7px; left:12px; width:1px; height:5px; background:#ffffaf; } .r7c13-16{ top:7px; left:13px; width:1px; height:6px; background:#fff; } .r7c14-16{ top:7px; left:14px; width:1px; height:6px; background:#000; } /*row 8 */ .r8c3-94{ top:8px; left:3px; width:9px; height:4px; background:#ff0; } .r8c15-16{ top:8px; left:15px; width:1px; height:6px; background:#b4b4b4; } /* row 9 */ .r9c6-12{ top:9px; left:6px; width:1px; height:2px; background:#f00; } .r9c8-12{ top:9px; left:8px; width:1px; height:2px; background:#f00; } .r10c7-12{ top:10px; left:7px; width:1px; height:2px; background:#f00; } .r12c3-121{ top:12px; left:3px; width:11px; height:1px; background:#ffd700; } /*row 13 */ .r13c1-11{ top:13px; left:1px; width:1px; height:1px; background:#000; } .r13c2-111{ top:13px; left:2px; width:11px; height:1px; background:#d0b000; } .r13c13-11{ top:13px; left:13px; width:1px; height:1px; background:#000; } .r13c14-21{ top:13px; left:14px; width:2px; height:1px; background:#b4b4b4; } /* row 14 */ .r14c2-111{ top:14px; left:2px; width:11px; height:1px; background:#000; } .r14c13-21{ top:14px; left:13px; width:2px; height:1px; background:#b4b4b4; } /* row 15 */ .r15c3-111{ top:15px; left:3px; width:11px; height:1px; background:#b4b4b4; } </style> </head> <body> <div> <em> </em> <em> </em> <em> </em> <em> </em> <em> </em> <em> </em> <em> </em> <em> </em> <em> </em> <em> </em> <em> </em> <em> </em> <em> </em> <em> </em> <em> </em> <em> </em> <em> </em> <em> </em> <em> </em> <em> </em> <em> </em> <em> </em> <em> </em> <em> </em> <em> </em> <em> </em> <em> </em> <em> </em> <em> </em> <em> </em> <em> </em> <em> </em> <em> </em> <em> </em> <em> </em> <em> </em> <em> </em> <em> </em> <em> </em> <em> </em> <em> </em> <em> </em> <em> </em> <em> </em> <em> </em> <em> </em> <em> </em> <em> </em> <em> </em> <em> </em> <em> </em> </div> </body> </html>
提示:您可以先修改部分代码再运行