

jfinal 是 orm+mvc 而且有易与扩展的render plugin等机制。
JFinal框架也整合了Spring框架,下面实现JFinal怎么去配置Spring框架。在JFinal中整合Spring使用到的类是SpringPlugin和IocInterceptor类。
Eclipse IDE for Java EE Developers 中
1、创建 Dynamic Web Project
2、修改 Default Output Folder,推荐输入 WebRootWEB-INFclasses
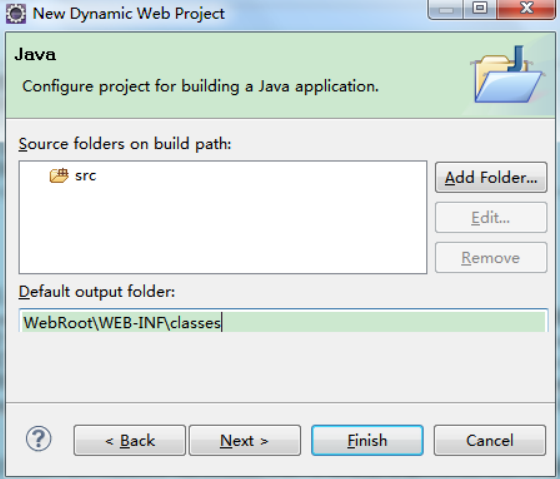
特别注意:此处的 Default out folder 必须要与 WebRootWEB-INFclasses 目录
完全一致才可以使用 JFinal 集成的 Jetty 来启动项目。
3、修改 Content directory,推荐输入 WebRoot
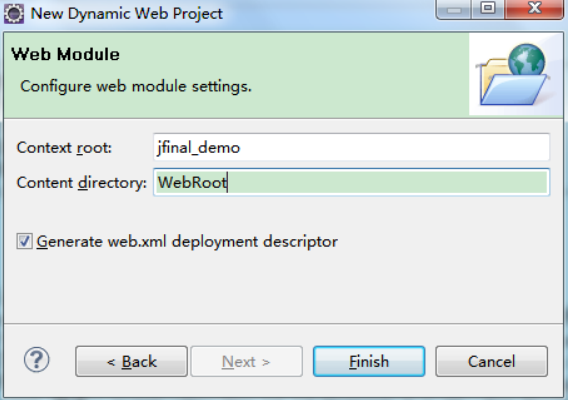
注 意 : 此 处 也 可 以 使 用 默 认 值 WebContent , 但 上 一 步 中 的
WebRootWEB-INFclasses 则需要改成 WebContentWEB-INFclasses 才能对应上。
4、去官网下载最新的jar包(我这是JFinal-lib-1.9)
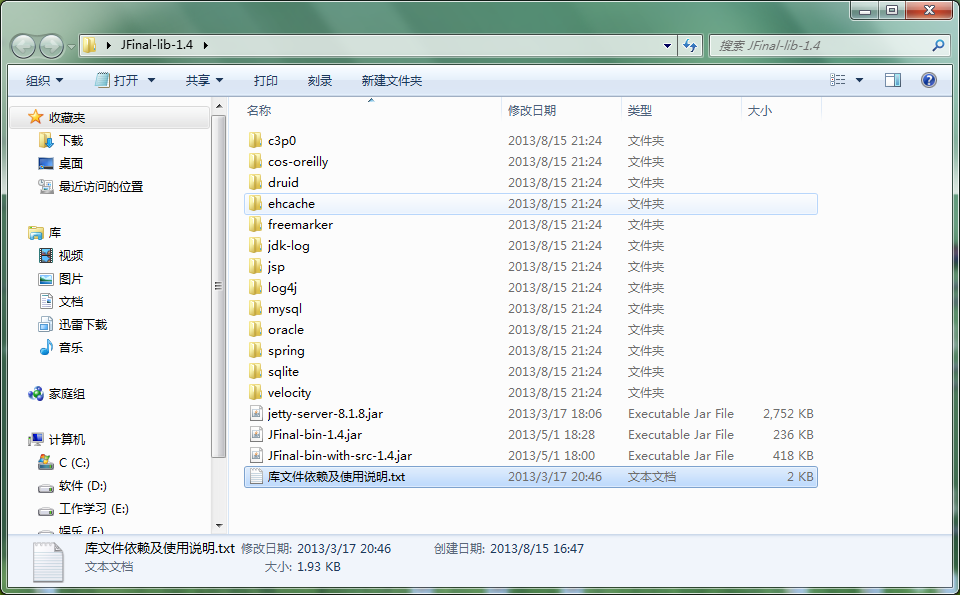
把jetty-server-8.1.8.jar 和JFinal-bin-1.4.jar放到项目 WEB-INFlib下,jetty-server-8.1.8.jar是开发时使用的运行环境,用tomact和生产环境下就不需要了
5、添加到web.xml

6、在项目 src 目录下创建 demo 包,并在 demo 包下创建 DemoConfig 文件, 内容如下:
package demo;import com.jfinal.config.*;public class DemoConfig extends JFinalConfig {public void configConstant(Constants me) { me.setDevMode(true); }public void configRoute(Routes me) { me.add("/hello", HelloController.class); }public void configPlugin(Plugins me) {}public void configInterceptor(Interceptors me) {}public void configHandler(Handlers me) {} }注意:DemoConfig.java 文件所在的包以及自身文件名必须与 web.xml 中的param-value 标签内的配置相一致(在本例中该配置为 demo.DemoConfig)。
在 demo 包下创建 HelloController 类文件, 内容如下:
package demo;import com.jfinal.core.Controller;public class HelloController extends Controller {public void index() { renderText("Hello JFinal World."); } }6、右击项目名

选中com.jfinal.core.JFinal ok
7、浏览器输入localhost/hello输出内容为 Hello JFinal World 证明项目框架搭建完成。
注意:在 tomcat 下开发或运行项目时,需要先删除 jetty-server-xxx.jar 这个包,否则会引起冲突。
(抄袭官网api,罪过罪过....)
jfinal真的挺简单,迅速,强大的一个框架,没有ssh的N多xml配置文件,后面做个简单的学生信息管理,配合FreeMarker
jfinal集成spring
SpringIplugin类:
SpringPlugin 是作为 JFinal 的 Plugin 而存在的,所以使用时需要在 JFinalConfig 中配置SpringPlugin,以下是 Plugin 配置示例代码:
@Override public void configPlugin(Plugins me) { <span style="white-space:pre"> </span>//配置Spring挂件 me.add(new SpringPlugin()); }若创建 SpringPlugin 对 象 时 未 指 定 构 造 方 法 中 的 形 参 , SpringPlugin 将 自动去WebRoot/WEB-INF 目录下寻找 applicationContext.xml 作为配置文件进行初始化。您还可以通过另外两个构造方法指定配置文件或 ApplicationContext 对象。
以前学习Spring养成了习惯将Spring的配置放在src下,这里我还是放在src的spring包中,如下:
@Override public void configPlugin(Plugins me) { //配置Spring挂件, 自动找spring包中所有的xml配置文件 me.add(new SpringPlugin("classpath*:spring/*.xml")); }IocInterceptor类:
IocInterceptor 拦截 action 并对其进行依赖注入,以下是示例代码:
package com.tenghu.core.controller;import java.util.List;import com.jfinal.aop.Before; import com.jfinal.core.Controller;import com.jfinal.plugin.spring.Inject;import com.jfinal.plugin.spring.IocInterceptor;import com.tenghu.core.model.Users; import com.tenghu.core.service.LoginService;import com.tenghu.core.validator.LoginValidator; @Before(IocInterceptor.class)public class IndexController extends Controller{ @Inject.BY_NAME private LoginService loginService; public void index( ){ List<Users> testList=Users.dao.find("select * from users"); setAttr("testList", testList); render("login.html"); } public void login(){ String username=getPara("name"); String password=getPara("password"); if(loginService.login(username, password)){ renderText("登录成功"); }else{ renderText("登录失败"); } } }上例将对 loginService 按属性名称进行注入。注解@Inject.BY_NAME 按属性名进行注入,@Inject.BY_TYPE 按类型进行注入。不指定注入类型时将不会进行注入。
登录服务接口与实现类:
package com.tenghu.core.service;public interface LoginService { /** * 登录处理 */ public boolean login(String username,String password); } package com.tenghu.core.service.impl;import com.tenghu.core.service.LoginService;public class LoginServiceImpl implements LoginService { /** * 登录处理 */ public boolean login(String username, String password) { if("admin".equals(username)&&"admin".equals(password)) { return true; } return false; } }Spring配置文件:
<?xml version="1.0" encoding="UTF-8"?> <beans xmlns="/schema/beans" xmlns:xsi="/2001/XMLSchema-instance" xmlns:aop="/schema/aop" xmlns:tx="/schema/tx" xsi:schemaLocation=" /schema/beans /schema/beans/spring-beans-2.5.xsd /schema/aop /schema/aop/spring-aop-2.5.xsd /schema/tx /schema/tx/spring-tx-2.5.xsd" <span style="white-space:pre"> default-autowire="byName"</span>> <bean id="loginService" class="com.tenghu.core.service.impl.LoginServiceImpl"/></beans>配置完成
JFinal Dao 集成到 Spring
最近公司其它部门的同事还有朋友都表示对jfinal有很大的兴趣,我发现最主要的一点是jfianl极简风格和牛x的开发效率让大家为之兴奋,尤其是jfinal的dao设计。至于没有在新项目中进行尝试,因为好多项目需要对事务尤其是多库事务上进行处理,而这点也让大家犯难了起来。公司目前的项目是基于springmvc+mybatis,所以我将jfinal dao 集成到spring上,利用spring 强大的事务抽象能力解决事务难题。
不说了,先上代码。。
?
12
3
4
5
6
7
8
9
10
11
12 <bean id="jFinalDaoConfig" class="com.jfinal.plugin.activerecord.JFinalDaoConfig" init-method="init">
<property name="configName" value="main" />
<property name="dataSource" ref="dataSource"/>
<property name="dialect">
<bean class="com.jfinal.plugin.activerecord.dialect.AnsiSqlDialect"/>
</property>
<property name="modelsClasses">
<set>
<value>test.AAA</value>
</set>
</property>
</bean>
?
12
3
4
5
6
7
8
9
10
11
12
13
14
15
16
17
18
19
20
21
22
23
24
25
26
27
28
29
30
31
32
33
34
35
36
37
38
39
40
41
42
43
44
45
46
47
48
49
50
51
52
53
54
55
56
57
58
59
60
61
62
63
64
65
66
67
68
69
70
71
72
73
74 public class JFinalDaoConfig {
protected final Logger log = Logger.getLogger(getClass());
public void init(){
if (null == dialect) {
log.warn("Using mysql dialect as default.");
dialect = new MysqlDialect();//默认mysql方言
}
//config与dataSource相关绑定
Config config = new Config(configName, dataSource, dialect);
DbKit.addConfig(config);
Iterator<Class<Model>> iterModel = modelsClasses.iterator();
Class modelClass = null;
while (iterModel.hasNext()) {
modelClass = iterModel.next();
Class superClass = modelClass.getSuperclass();
if (null==superClass || superClass!=Model.class) {
log.warn(modelClass + " should extends com.jfinal.plugin.activerecord.Model");
continue;
}
DbKit.addModelToConfigMapping(modelClass, config);//model与config绑定
TableBinding tb = (TableBinding) modelClass.getAnnotation(TableBinding.class);//获取model对应的表信息
&nbnbsp;if (tb != null) {
Table table = null;
if (StrKit.notBlank(tb.pkName())) {
table = new Table(tb.tableName(), tb.pkName(), modelClass);
} else {
table = new Table(tb.tableName(), modelClass);
}
tableList.add(table);
}
}
if (!tableList.isEmpty()){
TableBuilder.build(tableList, config);
}
Db.init();
}
private List<Table> tableList = new ArrayList<Table>();
private String configName;
private DataSource dataSource;
private Dialect dialect;
private Set<Class<Model>> modelsClasses;
public void setConfigName(String configName) {
if (configName == null) {
throw new IllegalArgumentException("Config name can not be null");
}
this.configName = configName;
}
public void setDataSource(DataSource dataSource) {
if (dataSource == null) {
throw new IllegalArgumentException("DataSource can not be null");
}
this.dataSource = dataSource;
}
public void setDialect(Dialect dialect) {
this.dialect = dialect;
}
public void setModelsClasses(Set<Class<Model>> modelsClasses) {
this.modelsClasses = modelsClasses;
}
}
JFinalDaoConfig的作用就是将config与数据库绑定,模型与config进行绑定,这个类的作用我相信大家如果对jfinal比较熟悉,应该不难理解。
jfianl Model、DbPro 的获取和释放连接采用了spring的DataSourceUtils进行替换
//conn = config.getConnection();
conn = DataSourceUtils.getConnection(config.getDataSource());
JdbcUtils.closeStatement(pst);
DataSourceUtils.releaseConnection(conn, config.getDataSource());
由于jfianl某些类的可见性,JFinalDaoConfig需要放到com.jfinal.plugin.activerecord下
这样就可以利用spring的事务和jfinal dao的方便性了。